1072 lines
53 KiB
Markdown
1072 lines
53 KiB
Markdown
|
|
# 厚涂绘制过程笔记
|
|||
|
|
[[厚涂绘画过程笔记]]
|
|||
|
|
|
|||
|
|
# 知乎卡通渲染文章参考
|
|||
|
|
![[知乎骨鱼子的厚涂实现]]
|
|||
|
|
|
|||
|
|
|
|||
|
|
# 其他参考
|
|||
|
|
|
|||
|
|
|
|||
|
|

|
|||
|
|
|
|||
|
|
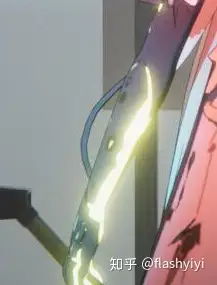
网易游戏效果参考:
|
|||
|
|

|
|||
|
|
![[Netease_ToonEffect.png]]
|
|||
|
|
|
|||
|
|
|
|||
|
|
《推子》星星瞳眼睛效果参考:https://www.bilibili.com/video/BV11o4y187uS/?vd_source=d47c0bb42f9c72fd7d74562185cee290
|
|||
|
|
物理效果插件:Phys control component in UE 5.1 content examples
|
|||
|
|
- [x] 异度之刃3 CEDEC渲染分享 https://zhuanlan.zhihu.com/p/588630949
|
|||
|
|
- [ ] https://mp.weixin.qq.com/s/gEp44rwWaULJuouWc0byKw
|
|||
|
|
|
|||
|
|
# UE5存在问题
|
|||
|
|
不开启Lumen会出现SkyLightDiffuse、ReflectionIndirect。
|
|||
|
|
开启Lumen之后这个2个Pass会消失。
|
|||
|
|
|
|||
|
|
# 技术路线
|
|||
|
|
UE上厚涂的实现思路是在实现赛璐璐风格的基础上,再通过各种物理光照功能,比如天光、各种灯光、阴影、GI获取到各种Mask,之后根据设置的曲线渲染出Ramp贴图进行映射叠加在到模型上来实现。
|
|||
|
|
|
|||
|
|
#TODO
|
|||
|
|
1. 在ToonWorldSettings中添加相关逻辑。
|
|||
|
|
1. Subsurface AO相关参数调整:
|
|||
|
|
2. Shadow NoL Ramp。
|
|||
|
|
3. 尝试修复 披发处AO、阴影没有影响而导致的散射过亮的问题。
|
|||
|
|
4. 在SkyLighting、Reflection、AO中添加对应参数。
|
|||
|
|
5. 其他相关渲染设置:调用IsSubsurfaceModel()的Shader:ShdowProjectionPixelShader.usf、DistanceFieldShadowing.usf、DeferredLightingCommon.ush(接触阴影相关)
|
|||
|
|
|
|||
|
|
- 大致复现Kama的渲染环境
|
|||
|
|
- [x] 复现灯光环境 2022.9.8
|
|||
|
|
- [x] 复现皮肤表面的Lambert效果(分为去掉Blender后处理与没有后处理) 2022.9.8
|
|||
|
|
- ToonWorldSettings工具
|
|||
|
|
- 添加问题检查功能
|
|||
|
|
- [x] 添加天光类型检查。天光必须为Dynamic,不然角色无法接受到天光效果。
|
|||
|
|
- 增加MaterialCustomOutputNode来实现BasePass阶段的一些效果控制
|
|||
|
|
- [x] 添加对SubsurfaceColor对DiffuseColorForIndirect影响的偏移控制(加法)。
|
|||
|
|
- [x] 添加对DiffuseIndirectLighting与SubsurfaceIndirectLighting的Alpha控制(乘法)。
|
|||
|
|
- 修改ToonSkin的ShaderModel。
|
|||
|
|
- [x] 将BaseColor、Specular=>BaseColor+Specular+Transmission 2022.9.8
|
|||
|
|
- [x] ~~Diffuse使用HalfBurly,Specular使用ToonStandard,Transmission 使用预积分皮肤版本的代码。~~改成了编辑器通过曲线贴图修改的版本
|
|||
|
|
- [x] 将YivanLee的预积分贴图换成,UE自带的贴图并且乘以颜色(Profiles里默认的那种红色)。
|
|||
|
|
- [x] 红肩膀红膝盖,可以通过偏移曲率的方式来实现。配合绘制SubsurfaceColorTexture与Opacity贴图 。
|
|||
|
|
- 给SkyLightingAndReflectionPass添加Ramp逻辑
|
|||
|
|
- [x] 天光的SSS处增加倍率控制以及Opacity控制项。NoV影响加载Opacity中,可以在材质编辑器中叠加。
|
|||
|
|
- [x] ToonWorldSettings 增加天光Shadow是否开启选项检查。
|
|||
|
|
- [x] 增加IBL相关的倍增与倍增区间控制。
|
|||
|
|
- 后处理
|
|||
|
|
- [x] 添加可以分区域控制的ToonBloom
|
|||
|
|
- [x] 添加SNN油画滤镜效果
|
|||
|
|
- 优化
|
|||
|
|
- [ ] 提高Ramp贴图的U轴分辨率,256=》512 或者1024
|
|||
|
|
- [ ] 将ToonData的一个像素一个数据合并成一个像素4个数据
|
|||
|
|
- [ ] 设置ToonData的压缩设置,设置为不压缩
|
|||
|
|
- https://zhuanlan.zhihu.com/p/401111461
|
|||
|
|
- 参考https://zhuanlan.zhihu.com/p/498588384
|
|||
|
|
- [ ] 预积分贴图生成工具 ,对马鬼之岛的分享,有关曲率的计算有些复杂 https://blog.selfshadow.com/publications/s2020-shading-course/patry/slides/index.html#/90/0/0 相关代码参考[[#曲率计算]] (其中R()表示扩散曲线,以高斯和形式得到 
|
|||
|
|

|
|||
|
|
- [ ] CGBull说SG方法会使用Shadow作为NoL再计算一次 SG SSS,那Lut是否也可以这么做呢?阴影的值是0-1的所以需要做一个缩放让其变为-1到1,代码是其实就是* 2-1即可。
|
|||
|
|
- [ ] SSS - SG https://zhuanlan.zhihu.com/p/139836594
|
|||
|
|
- 使用与原理说明文档编写
|
|||
|
|
- 原理说明文档[[厚涂风格渲染文档#原理说明]]
|
|||
|
|
- [ ] ToonSkin
|
|||
|
|
- [ ] SkyLightMask
|
|||
|
|
- [ ] ReflectionMask
|
|||
|
|
- [ ] AO(SSAO或者RtxAO)
|
|||
|
|
- [ ] Outline
|
|||
|
|
- [ ] PostProcess
|
|||
|
|
- [ ] MeshDraw
|
|||
|
|
- [ ] GI
|
|||
|
|
- [ ] ToonPostProcess
|
|||
|
|
- 用户使用说明文档[[厚涂风格渲染文档#用户使用说明]]
|
|||
|
|
- [ ] 贴图与Ramp介绍
|
|||
|
|
- [ ] 如何绘制曲率贴图
|
|||
|
|
- [ ] 如何使用XXX编辑器
|
|||
|
|
- 在ToonMaterial中使用的材质函数文档
|
|||
|
|
- [ ] Fake AO
|
|||
|
|
- 相关编辑器编写
|
|||
|
|
- Toon渲染功能控制器
|
|||
|
|
- toon skin组,数据与各种ramp编辑器
|
|||
|
|
- 多层curve ramp编辑器
|
|||
|
|
- 厚涂元素分析文档[[厚涂风格渲染文档#厚涂元素分析]]
|
|||
|
|
- 参考作品收集
|
|||
|
|
- 蓝色反射
|
|||
|
|
- 莱莎的炼金工坊2
|
|||
|
|
- 皮肤
|
|||
|
|
- [ ] 模拟SSS效果
|
|||
|
|
- [ ] 黑色描边或者边缘处的渐变
|
|||
|
|
- [ ] 天光与反射
|
|||
|
|
- 丝袜
|
|||
|
|
- 布料
|
|||
|
|
- 完成其他功能Mask方案之后,尝试实现SubsurfaceProfiles方案版本
|
|||
|
|
|
|||
|
|
## 相关渲染功能
|
|||
|
|
### 渲染功能的Mask与Ramp贴图
|
|||
|
|
- ShadingModel
|
|||
|
|
- 主光与其他光源Mask
|
|||
|
|
- ~~次表面采样后的透明度~~
|
|||
|
|
- 阴影Mask
|
|||
|
|
- 反射与天光
|
|||
|
|
- 天光Mask
|
|||
|
|
- 反射Mask
|
|||
|
|
- IBLMask
|
|||
|
|
- GI
|
|||
|
|
- 二阶球谐
|
|||
|
|
- 可以使用一张贴图控制球谐对于模型的影响值,以及通过亮度对球谐结果进行重映射。
|
|||
|
|
- 边缘光(实现以下两种,具体然后美术选择)
|
|||
|
|
- 使用NoV实现边缘光效果(在材质中实现)?
|
|||
|
|
- 后处理边缘光?
|
|||
|
|
- 其他Fake
|
|||
|
|
-
|
|||
|
|
|
|||
|
|
|
|||
|
|
在角色上增加Flow/Ramp偏移贴图,来增加涂抹感。使用一个GBuffer通道来添加,计算过程需要将(0,1)=>(-1,1)来计算。
|
|||
|
|
|
|||
|
|
#### Ramp工具
|
|||
|
|
- 拥有多个通道,并且每个通道可以通过曲线来生成Ramp,并且预览。
|
|||
|
|
- 每个通道都可以设置权重比。
|
|||
|
|
- 最后根据通道生成最终的Ramp贴图。
|
|||
|
|
|
|||
|
|
### 后处理效果
|
|||
|
|
1. 实现水彩的后处理效果?
|
|||
|
|
2. 类似原神的Glow效果
|
|||
|
|
|
|||
|
|
### 非厚涂部分
|
|||
|
|
#### Tonemapping
|
|||
|
|
参考[[知乎FlashYiYi的卡通渲染分享#处理偏色]]以及[[知乎FlashYiYi的卡通渲染分享#卡通风格场景的定制化技术部分]]
|
|||
|
|
|
|||
|
|
|
|||
|
|
在使用标准ACES的时候,如果亮度调的较低,暗部细节就会严重丢失(图2),而如果调高亮度至能看清暗部细节,亮部细节就会丢失(图3)。
|
|||
|
|
|
|||
|
|
思路有2:
|
|||
|
|
- 使用修改过的ToneMapping公式:color = 3.4475 * color ^ 3 - 2.7866 * color ^ 2 + 1.2281 * color - 0.0056
|
|||
|
|
- 使用Anit-ToneMapping公式修改贴图颜色。(泛用性更大一些)
|
|||
|
|
|
|||
|
|
|
|||
|
|
#### 脸部修改法线效果
|
|||
|
|
https://zhuanlan.zhihu.com/p/126668414
|
|||
|
|
SDF的方法:
|
|||
|
|
<iframe src="https://vdn6.vzuu.com/SD/7ed79baa-233a-11eb-92f5-ba7007c018c6.mp4?pkey=AAUpN6HjdduzqHYGh6K32B22vRKScdsZM5g0TZbjtn_56mdBihsE9nkRyxjKomefq131pUghTvHgVZCQALNEn8G8&c=avc.0.0&f=mp4&pu=078babd7&bu=078babd7&expiration=1665647689&v=ks6" scrolling="no" border="0" frameborder="no" framespacing="0" allowfullscreen="true"> </iframe>
|
|||
|
|
|
|||
|
|
除了使用SDF之外,就只有这个方法,可以兼容多光源过度的效果。
|
|||
|
|

|
|||
|
|
https://note.com/sfna32121/n/n8d46090005d1?tdsourcetag=s_pctim_aiomsg
|
|||
|
|
|
|||
|
|
#### 蓝色协议与新樱花大战色调设计
|
|||
|
|
- 蓝色协议有一套色调系统
|
|||
|
|
- 樱花大战是通过原画来设计色调系统
|
|||
|
|
|
|||
|
|
#### 樱花大战的曲率插值Ramp
|
|||
|
|
|
|||
|
|
|
|||
|
|
|
|||
|
|
|
|||
|
|
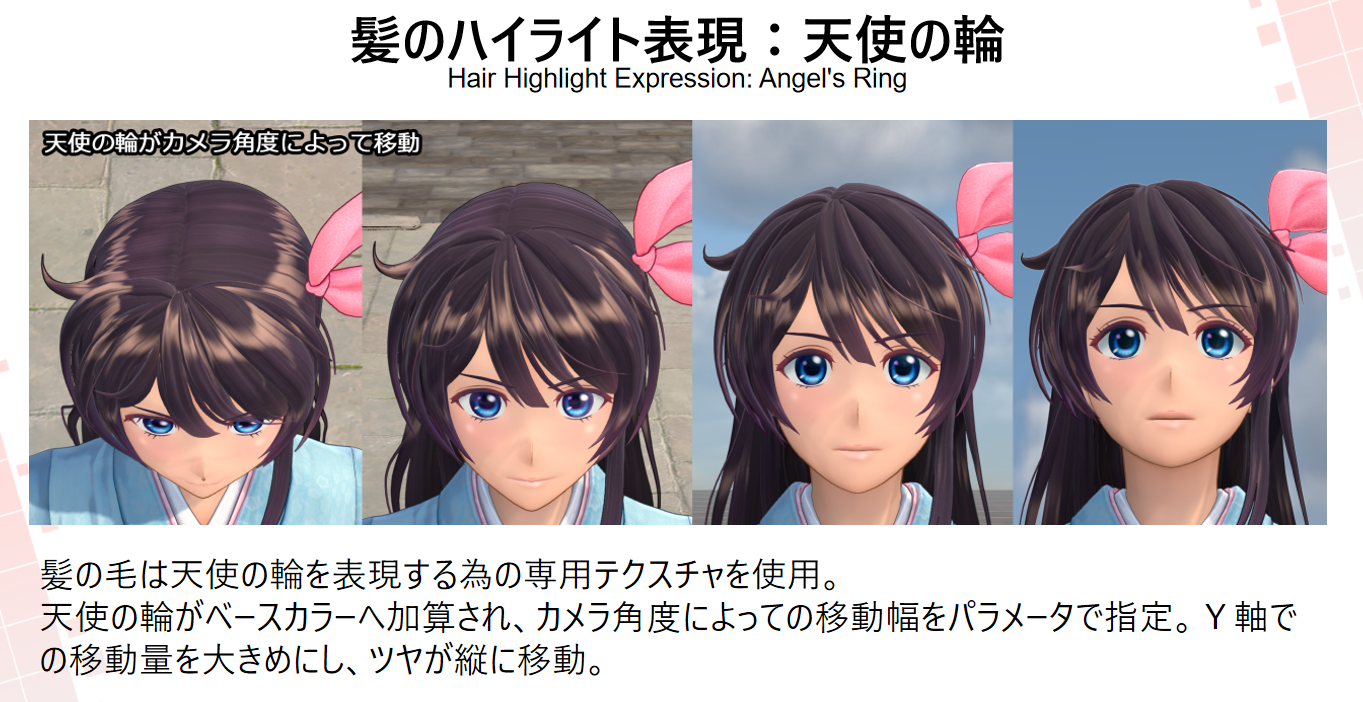
#### 头发高光(天使环)
|
|||
|
|
https://zhuanlan.zhihu.com/p/126668414
|
|||
|
|
|
|||
|
|
|
|||
|
|

|
|||
|
|
|
|||
|
|
子弹少女用了一个特别的方法:在y轴角度到达一个阈值后,会把这个光带渐渐裁掉。但这样做非常重要的一点是,裁掉光带后必须在头顶位置显示一个新的光带(图中的中心散射光带),否则从用户视觉角度,他们会觉得高光突然消失了,从而使得头发的光照特性突然改变了。
|
|||
|
|
|
|||
|
|
因为这其实是一个近似正面光照的模型,所以对着镜头的正面是应该有反光的。子弹少女的处理方法虽然不错,但这个头顶光带对画风是有一定要求的,并不是所有的画风都能兼容。而除此之外的方案暂时我就不知道了。那个时候,恐怕你就只能选择限制摄像机。
|
|||
|
|
|
|||
|
|
|
|||
|
|
|
|||
|
|
|
|||
|
|
#### 自定义形状的高光
|
|||
|
|
Stylized Highlights for Cartoon Rendering and Animation
|
|||
|
|
风格化卡通高光Stylized Highlights for Cartoon Rendering
|
|||
|
|
|
|||
|
|
#### 后处理边缘光
|
|||
|
|
|
|||
|
|
边缘光他们采用了和投影类似的深度检测法,以便生成固定宽度的边缘光,根据光照方向决定偏移距离即可。这个边缘光主要还是面光时出现,用于勾勒人物边缘。
|
|||
|
|
|
|||
|
|
#### 特定场景的画面氛围后处理效果
|
|||
|
|
|
|||
|
|
|
|||
|
|
|
|||
|
|
|
|||
|
|
|
|||
|
|
|
|||
|
|
## 资产生产与校验
|
|||
|
|
### 测试场景
|
|||
|
|
建立几个典型光照测试场景。
|
|||
|
|
1. 室内/室外
|
|||
|
|
1. 早晨
|
|||
|
|
2. 正午
|
|||
|
|
3. 下午
|
|||
|
|
4. 傍晚
|
|||
|
|
5. 夜晚
|
|||
|
|
|
|||
|
|
### 测试工具与插件
|
|||
|
|
将AutomaticMaterial项目中使用的灯光矫正工具移植到插件中。
|
|||
|
|
|
|||
|
|
### Vroid导入工具移植
|
|||
|
|
|
|||
|
|
# 实现笔记
|
|||
|
|
## SSS Mask
|
|||
|
|
3种SSS的Diffuse与Specular项都使用DefaultLit。UE自带的`PreintegratedSkinBxDF`是通过一个张 `灰度预积分贴图` * `SubsurfaceColor`来实现预积分效果。
|
|||
|
|
|
|||
|
|
### UE的三种SubsurfaceShaderModel
|
|||
|
|
#### SubsurfaceBxDF
|
|||
|
|
```c++
|
|||
|
|
// hard coded pow constant
|
|||
|
|
float InScatter = pow(saturate(dot(L, -V)), 12) * lerp(3, .1f, Opacity);
|
|||
|
|
// wrap around lighting, /(PI*2) to be energy consistent (hack do get some view dependnt and light dependent effect)
|
|||
|
|
// Opacity of 0 gives no normal dependent lighting, Opacity of 1 gives strong normal contribution
|
|||
|
|
float NormalContribution = saturate(dot(N, H) * Opacity + 1 - Opacity);
|
|||
|
|
float BackScatter = GBuffer.GBufferAO * NormalContribution / (PI * 2);
|
|||
|
|
|
|||
|
|
// lerp to never exceed 1 (energy conserving)
|
|||
|
|
Lighting.Transmission = AreaLight.FalloffColor * ( Falloff * lerp(BackScatter, 1, InScatter) ) * SubsurfaceColor;
|
|||
|
|
```
|
|||
|
|
可以看得出主要由于InScatter(Opacity)为控制大头。Mask可以认为是`lerp(BackScatter, 1, InScatter)`。
|
|||
|
|
|
|||
|
|
#### PreintegratedSkinBxDF
|
|||
|
|
```c++
|
|||
|
|
float3 PreintegratedBRDF = Texture2DSampleLevel(View.PreIntegratedBRDF, View.PreIntegratedBRDFSampler, float2(saturate(dot(N, L) * .5 + .5), 1 - Opacity), 0).rgb;
|
|||
|
|
Lighting.Transmission = AreaLight.FalloffColor * Falloff * PreintegratedBRDF * SubsurfaceColor;
|
|||
|
|
```
|
|||
|
|
预积分的Mask与预积分贴图有关,大约有25%是0与1,中间是过度;预积分的UV轴分别为dot(N, L) (-1,1)=>(0,1) ,与 1 - Opacity 或者曲率?。LUT生成公式
|
|||
|
|
|
|||
|
|
https://zhuanlan.zhihu.com/p/384541607
|
|||
|
|
|
|||
|
|

|
|||
|
|
|
|||
|
|
#### SubsurfaceProfileBxDF
|
|||
|
|
参考:
|
|||
|
|
1. 真实感皮肤渲染技术总结:https://zhuanlan.zhihu.com/p/42433792
|
|||
|
|
1. Separable Subsurface Scattering
|
|||
|
|
|
|||
|
|
- Diffuse项:Diffuse_Burley模型
|
|||
|
|
- Specular项:调用GetProfileDualSpecular()读取Profile的数据AverageToRoughness0、AverageToRoughness1、LobeMix,非面光源使用DualSpecularGGX()来计算结果。
|
|||
|
|
- Transmission项:调用ExtractSubsurfaceProfileInt()通过GBuffer.CustomData.r来Profile数据行数`SubsurfaceProfileInt`,U轴向使用宏来确定偏移。之后采样对应位置来取得参数。
|
|||
|
|
1. FTransmissionProfileParams:调用GetTransmissionProfileParams()。采样生成的ActualSSProfilesTexture(`SSProfilesTexture`)贴图来获取数据。4个通道数据分别为ExtinctionScale、NormalScale、ScatteringDistribution、OneOverIOR。
|
|||
|
|
2. float3 Profile:调用GetTransmissionProfile()。
|
|||
|
|
1. 使用`ActualSSProfilesTexture.GetDimensions`获取贴图大小。
|
|||
|
|
2. bool bUseBurley :GetSubsurfaceTransmittanceProfileUseBurley(SubsurfaceProfileInt);之后决定使用哪一个偏移来采样,最终返回float3 Profile。
|
|||
|
|
3. 计算PhaseFunction值。
|
|||
|
|
4. `Lighting.Transmission = AreaLight.FalloffColor * Profile * (Falloff * PhaseFunction);`
|
|||
|
|
```c++
|
|||
|
|
FTransmissionProfileParams GetTransmissionProfileParams(FGBufferData GBufferData)
|
|||
|
|
{
|
|||
|
|
FTransmissionProfileParams Result;
|
|||
|
|
|
|||
|
|
// 0..255, which SubSurface profile to pick
|
|||
|
|
uint SubsurfaceProfileInt = ExtractSubsurfaceProfileInt(GBufferData);
|
|||
|
|
|
|||
|
|
//X:ExtinctionScale, Y:Normal Scale, Z:ScatteringDistribution, W:OneOverIOR
|
|||
|
|
float4 Data = ActualSSProfilesTexture.Load(int3(SSSS_TRANSMISSION_OFFSET, SubsurfaceProfileInt, 0));
|
|||
|
|
|
|||
|
|
Result.ExtinctionScale = Data.x;
|
|||
|
|
Result.NormalScale = Data.y;
|
|||
|
|
Result.ScatteringDistribution = Data.z;
|
|||
|
|
Result.OneOverIOR = Data.w;
|
|||
|
|
|
|||
|
|
return Result;
|
|||
|
|
}
|
|||
|
|
|
|||
|
|
uint ExtractSubsurfaceProfileInt(FGBufferData BufferData)
|
|||
|
|
{
|
|||
|
|
// can be optimized
|
|||
|
|
return uint(BufferData.CustomData.r * 255.0f + 0.5f);
|
|||
|
|
}
|
|||
|
|
```
|
|||
|
|
`ActualSSProfilesTexture`所有数据偏移:
|
|||
|
|
```c++
|
|||
|
|
#define SSSS_SUBSURFACE_COLOR_OFFSET 0
|
|||
|
|
#define BSSS_SURFACEALBEDO_OFFSET (SSSS_SUBSURFACE_COLOR_OFFSET+1)
|
|||
|
|
#define BSSS_DMFP_OFFSET (BSSS_SURFACEALBEDO_OFFSET+1)
|
|||
|
|
#define SSSS_TRANSMISSION_OFFSET (BSSS_DMFP_OFFSET+1)
|
|||
|
|
#define SSSS_BOUNDARY_COLOR_BLEED_OFFSET (SSSS_TRANSMISSION_OFFSET+1)
|
|||
|
|
#define SSSS_DUAL_SPECULAR_OFFSET (SSSS_BOUNDARY_COLOR_BLEED_OFFSET+1)
|
|||
|
|
#define SSSS_KERNEL0_OFFSET (SSSS_DUAL_SPECULAR_OFFSET+1)
|
|||
|
|
#define SSSS_KERNEL0_SIZE 13
|
|||
|
|
#define SSSS_KERNEL1_OFFSET (SSSS_KERNEL0_OFFSET + SSSS_KERNEL0_SIZE)
|
|||
|
|
#define SSSS_KERNEL1_SIZE 9
|
|||
|
|
#define SSSS_KERNEL2_OFFSET (SSSS_KERNEL1_OFFSET + SSSS_KERNEL1_SIZE)
|
|||
|
|
#define SSSS_KERNEL2_SIZE 6
|
|||
|
|
#define SSSS_KERNEL_TOTAL_SIZE (SSSS_KERNEL0_SIZE + SSSS_KERNEL1_SIZE + SSSS_KERNEL2_SIZE)
|
|||
|
|
#define SSSS_TRANSMISSION_PROFILE_OFFSET (SSSS_KERNEL0_OFFSET + SSSS_KERNEL_TOTAL_SIZE)
|
|||
|
|
#define SSSS_TRANSMISSION_PROFILE_SIZE 32
|
|||
|
|
#define BSSS_TRANSMISSION_PROFILE_OFFSET (SSSS_TRANSMISSION_PROFILE_OFFSET + SSSS_TRANSMISSION_PROFILE_SIZE)
|
|||
|
|
#define BSSS_TRANSMISSION_PROFILE_SIZE SSSS_TRANSMISSION_PROFILE_SIZE
|
|||
|
|
```
|
|||
|
|
|
|||
|
|
#### SSProfilesTexture生成逻辑
|
|||
|
|
USubsurfaceProfile通过成员变量`FSubsurfaceProfileStruct Settings`来存相关数据。meta设定为`UPROPERTY(Category = USubsurfaceProfile, EditAnywhere, meta = (ShowOnlyInnerProperties))`。
|
|||
|
|
```c++
|
|||
|
|
void UpdateProfile(const FSubsurfaceProfileStruct Settings, const USubsurfaceProfile* Profile)
|
|||
|
|
{
|
|||
|
|
int32 AllocationId = FindAllocationId(Profile);
|
|||
|
|
UpdateProfile(AllocationId, Settings);
|
|||
|
|
}
|
|||
|
|
```
|
|||
|
|
遍历`GSubsurfaceProfileTextureObject`中的`TArray<FSubsurfaceProfileEntry> SubsurfaceProfileEntries;`,寻找当前USubsurfaceProfile的Index。
|
|||
|
|
`SubsurfaceProfileEntries`
|
|||
|
|
1. 添加与更新逻辑由`UMaterialInterface::UpdateMaterialRenderProxy`触发,调用`GSubsurfaceProfileTextureObject.AddOrUpdateProfile()`。
|
|||
|
|
2. 移除逻辑由`USubsurfaceProfile::BeginDestroy()`触发,调用`GSubsurfaceProfileTextureObject.RemoveProfile();`。
|
|||
|
|
3. 更新逻辑由`USubsurfaceProfile::PostEditChangeProperty()`触发,调用`GSubsurfaceProfileTextureObject.UpdateProfile();`。
|
|||
|
|
|
|||
|
|
数据贴图生成逻辑位于`FSubsurfaceProfileTexture::CreateTexture()`。并在使用`GRenderTargetPool.FindFreeElement`在RTPool中创建RT。
|
|||
|
|
```c++
|
|||
|
|
static TRefCountPtr<IPooledRenderTarget> GSSProfiles;
|
|||
|
|
|
|||
|
|
GRenderTargetPool.FindFreeElement(RHICmdList, Desc, GSSProfiles, TEXT("SSProfiles"));
|
|||
|
|
```
|
|||
|
|
|
|||
|
|
获取的时候通过`TGlobalResource<FSubsurfaceProfileTexture> GSubsurfaceProfileTextureObject;`调用`FSubsurfaceProfileTexture::GetTexture()`来获取RT。
|
|||
|
|
|
|||
|
|
##### 生成内容
|
|||
|
|
|
|||
|
|
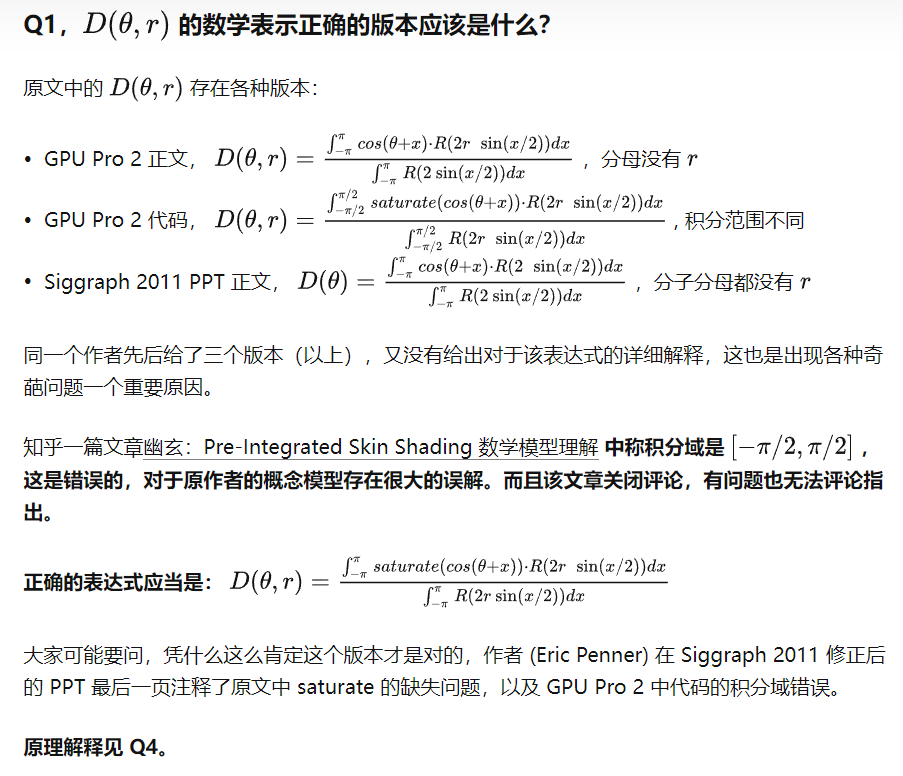
SeparableSSS_Profile这个函数的作用是是通过6个高斯函数拟合3个dipole曲线【**实际第一个0.233权重的高斯计算没有使用,应该考虑是直接反射光而非次表面散射**】,但确实只是计算了R通道的数据,然后B,G通道数据与R一致,估计是考虑R的扩散范围最远(人类皮肤是粉红色的)贡献最高,不过注释里也有说明FalloffColor已经包含了不同的值,所以这套方案也是适合蓝色皮肤生物的。
|
|||
|
|
|
|||
|
|
第三个函数是ComputeMirroredSSSKernel,定义了高斯卷积核实现的逻辑,因为高斯函数的可分离性,可以将原本的2D卷积降维到1D卷积;又因为高斯函数具有对称性,所以还可减少一半计算量。首先将半径范围计算后存入A通道,然后取像素i两边的A值做模糊存入area,最后将模糊后的权重与高斯函数拟合结果相乘获得RGB的最终权重并将正向权重结果写入RT。
|
|||
|
|
|
|||
|
|
#### DiffuseIndirectAndAO-DiffuseIndirectComposite
|
|||
|
|
SSGI/RTGI映射出的颜色。
|
|||
|
|
|
|||
|
|
#### SubsurfaceScattering
|
|||
|
|
1. 创建资源
|
|||
|
|
1. SceneColorTextureDescriptor
|
|||
|
|
2. SubsurfaceTextureDescriptor
|
|||
|
|
3. ProfileIdTextureDescriptor
|
|||
|
|
4. SubsurfaceTextureWith6MipsDescriptor
|
|||
|
|
5. 获取FSubsurfaceParameters结构体变量
|
|||
|
|
6. ProfileIdTexture
|
|||
|
|
7. VelocityTexture
|
|||
|
|
8. UAV SubsurfaceSubpassOneTex、SubsurfaceSubpassTwoTex
|
|||
|
|
9. UAV NewQualityHistoryTexture
|
|||
|
|
10. 一堆SeparableGroupBuffer、BurleyGroupBuffer、SeparableIndirectDispatchArgsBuffer、BurleyIndirectDispatchArgsBuffer
|
|||
|
|
2. FSubsurfaceInitValueBufferCS 初始化UAV数值为0
|
|||
|
|
3. FSubsurfaceIndirectDispatchSetupCS 调整Color与Specular之后输出到SetupTexture;输出ProfileId到ProfileIdTexture
|
|||
|
|
4. 生成Color与Specular的Mipmap
|
|||
|
|
5. FSubsurfaceIndirectDispatchCS 调整 RWIndirectDispatchArgsBuffer中的数值
|
|||
|
|
6. 执行4次 FSubsurfaceIndirectDispatchCS
|
|||
|
|
|
|||
|
|
#### PostProcessSubsurface
|
|||
|
|
最后还会进行以此**高斯模糊**。
|
|||
|
|
|
|||
|
|
#### 其他参数
|
|||
|
|
- **r.SSS.Scale**:可以用于调节效果以便快速试验。设置为 **0** 将禁用这种效果。在下图序列可以看到,设置大于0的数字将增强效果。
|
|||
|
|
- **r.SSS.SampleSet**:设置所用的样本数量。减小该值将使该效果更快速地运行。但是,这意味着效果将有更低的质量,可能会出现渲染瑕疵。
|
|||
|
|
- 下图显示系统的更多一些内部信息。该视图可以使用 **ShowFlag.VisualizeSSS 1** 来启用。
|
|||
|
|
|
|||
|
|
### PreintegratedSkin的额外添加项
|
|||
|
|
移植时需要注意一些额外添加部分:
|
|||
|
|
#### 灯光
|
|||
|
|
- ClusteredDeferredShadingPixelShader.usf 255行
|
|||
|
|
- TileDeferredLightShader.usf 341行
|
|||
|
|
|
|||
|
|
#### AmbientCubemapComposite.usf
|
|||
|
|
457行处增加ShaderModel判断条件:
|
|||
|
|
```c++
|
|||
|
|
// Subsurface
|
|||
|
|
BRANCH if(GBuffer.ShadingModelID == SHADINGMODELID_SUBSURFACE || GBuffer.ShadingModelID == SHADINGMODELID_PREINTEGRATED_SKIN || GBuffer.ShadingModelID == SHADINGMODELID_TOONSKIN)
|
|||
|
|
{
|
|||
|
|
// some view dependent and some non view dependent (hard coded)
|
|||
|
|
float DependentSplit = 0.5f;
|
|||
|
|
|
|||
|
|
float3 SubsurfaceColor = ExtractSubsurfaceColor(GBuffer);
|
|||
|
|
|
|||
|
|
// view independent (shared lookup for diffuse for better performance
|
|||
|
|
NonSpecularContribution += DiffuseLookup * SubsurfaceColor * (DependentSplit);
|
|||
|
|
// view dependent (blurriness is hard coded)
|
|||
|
|
SpecularContribution += TextureCubeSampleLevel(AmbientCubemap, AmbientCubemapSampler, ScreenVector, AbsoluteDiffuseMip - 2.5f).rgb * SubsurfaceColor * (AmbientOcclusion * (1.0f - DependentSplit));
|
|||
|
|
}
|
|||
|
|
```
|
|||
|
|
位于`RenderDiffuseIndirectAndAmbientOcclusion`阶段。增加SurfaceColor对AO与Specular的影响。背面会变得更亮一些。
|
|||
|
|
|
|||
|
|
#### BasePassPixelShader.usf
|
|||
|
|
899行处增加ShaderModel判断条件:
|
|||
|
|
```c++
|
|||
|
|
#if MATERIAL_SHADINGMODEL_SUBSURFACE || MATERIAL_SHADINGMODEL_PREINTEGRATED_SKIN || MATERIAL_SHADINGMODEL_TWOSIDED_FOLIAGE || MATERIAL_SHADINGMODEL_TOONSKIN
|
|||
|
|
else if (ShadingModel == SHADINGMODELID_SUBSURFACE || ShadingModel == SHADINGMODELID_PREINTEGRATED_SKIN || ShadingModel == SHADINGMODELID_TWOSIDED_FOLIAGE || ShadingModel == SHADINGMODELID_TOONSKIN)
|
|||
|
|
{
|
|||
|
|
SubsurfaceColor = SubsurfaceData.rgb * View.DiffuseOverrideParameter.w + View.DiffuseOverrideParameter.xyz;
|
|||
|
|
}
|
|||
|
|
#endif
|
|||
|
|
```
|
|||
|
|
1087行处增加ShaderModel判断条件:
|
|||
|
|
```c++
|
|||
|
|
#if MATERIAL_SHADINGMODEL_SUBSURFACE || MATERIAL_SHADINGMODEL_PREINTEGRATED_SKIN
|
|||
|
|
if (GBuffer.ShadingModelID == SHADINGMODELID_SUBSURFACE || GBuffer.ShadingModelID == SHADINGMODELID_PREINTEGRATED_SKIN)
|
|||
|
|
{
|
|||
|
|
// Add subsurface energy to diffuse
|
|||
|
|
//@todo - better subsurface handling for these shading models with skylight and precomputed GI
|
|||
|
|
DiffuseColorForIndirect += SubsurfaceColor;
|
|||
|
|
}
|
|||
|
|
#endif
|
|||
|
|
```
|
|||
|
|
将次表面散射的能量加到Diffuse中。
|
|||
|
|
|
|||
|
|
#### DeferredShadingCommon.ush
|
|||
|
|
303处增加:
|
|||
|
|
```c++
|
|||
|
|
bool IsSubsurfaceModel(int ShadingModel)
|
|||
|
|
{
|
|||
|
|
return ShadingModel == SHADINGMODELID_SUBSURFACE
|
|||
|
|
|| ShadingModel == SHADINGMODELID_PREINTEGRATED_SKIN
|
|||
|
|
|| ShadingModel == SHADINGMODELID_SUBSURFACE_PROFILE
|
|||
|
|
|| ShadingModel == SHADINGMODELID_TWOSIDED_FOLIAGE
|
|||
|
|
|| ShadingModel == SHADINGMODELID_HAIR
|
|||
|
|
|| ShadingModel == SHADINGMODELID_EYE
|
|||
|
|
|| ShadingModel == SHADINGMODELID_TOONSKIN;
|
|||
|
|
}
|
|||
|
|
```
|
|||
|
|
#### PathTracing相关跳过
|
|||
|
|
|
|||
|
|
## BasePass预计算GI与SkyLight项计算
|
|||
|
|
```c++
|
|||
|
|
//植物ShaderModel会计算背面
|
|||
|
|
const bool bEvaluateBackface = GetShadingModelRequiresBackfaceLighting(GBuffer.ShadingModelID);
|
|||
|
|
GetPrecomputedIndirectLightingAndSkyLight(MaterialParameters, Interpolants, BasePassInterpolants, LightmapVTPageTableResult, bEvaluateBackface, DiffuseDir, VolumetricLightmapBrickTextureUVs, DiffuseIndirectLighting, SubsurfaceIndirectLighting, IndirectIrradiance);
|
|||
|
|
```
|
|||
|
|
|
|||
|
|
#### GetPrecomputedIndirectLightingAndSkyLight
|
|||
|
|
结果包含间接照明(LightMap或者VLM)与SkyLight产生的间接照明结果,输出变量为:
|
|||
|
|
- DiffuseIndirectLighting
|
|||
|
|
- SubsurfaceIndirectLighting
|
|||
|
|
- IndirectIrradiance:为DiffuseIndirectLighting的亮度值。
|
|||
|
|
|
|||
|
|
### GetVolumetricLightmapSH1
|
|||
|
|
`TRANSLUCENCY_LIGHTING_VOLUMETRIC_NONDIRECTIONAL`使用:
|
|||
|
|
```c++
|
|||
|
|
FOneBandSHVectorRGB IrradianceSH = GetVolumetricLightmapSH1(VolumetricLightmapBrickTextureUVs);
|
|||
|
|
```
|
|||
|
|
GetVolumetricLightmapSH1本质为采样3D贴图`View.VolumetricLightmapBrickAmbientVector`:
|
|||
|
|
```c++
|
|||
|
|
float3 GetVolumetricLightmapAmbient(float3 BrickTextureUVs)
|
|||
|
|
{
|
|||
|
|
return Texture3DSampleLevel(View.VolumetricLightmapBrickAmbientVector, PIVSharedAmbientSampler, BrickTextureUVs, 0).xyz;
|
|||
|
|
}
|
|||
|
|
|
|||
|
|
FOneBandSHVectorRGB GetVolumetricLightmapSH1(float3 BrickTextureUVs)
|
|||
|
|
{
|
|||
|
|
float3 AmbientVector = GetVolumetricLightmapAmbient(BrickTextureUVs);
|
|||
|
|
|
|||
|
|
FOneBandSHVectorRGB IrradianceSH;
|
|||
|
|
IrradianceSH.R.V = AmbientVector.x;
|
|||
|
|
IrradianceSH.G.V = AmbientVector.y;
|
|||
|
|
IrradianceSH.B.V = AmbientVector.z;
|
|||
|
|
|
|||
|
|
return IrradianceSH;
|
|||
|
|
}
|
|||
|
|
```
|
|||
|
|
|
|||
|
|
其他非透明材质使用:
|
|||
|
|
```c++
|
|||
|
|
FThreeBandSHVectorRGB GetVolumetricLightmapSH3(float3 BrickTextureUVs)
|
|||
|
|
{
|
|||
|
|
float3 AmbientVector;
|
|||
|
|
float4 SHCoefficients0Red;
|
|||
|
|
float4 SHCoefficients0Green;
|
|||
|
|
float4 SHCoefficients0Blue;
|
|||
|
|
GetVolumetricLightmapSHCoefficients0(BrickTextureUVs, AmbientVector, SHCoefficients0Red, SHCoefficients0Green, SHCoefficients0Blue);
|
|||
|
|
|
|||
|
|
float4 SHCoefficients1Red = Texture3DSampleLevel(View.VolumetricLightmapBrickSHCoefficients1, PIVSharedSampler1, BrickTextureUVs, 0) * 2 - 1;
|
|||
|
|
float4 SHCoefficients1Green = Texture3DSampleLevel(View.VolumetricLightmapBrickSHCoefficients3, PIVSharedSampler3, BrickTextureUVs, 0) * 2 - 1;
|
|||
|
|
float4 SHCoefficients1Blue = Texture3DSampleLevel(View.VolumetricLightmapBrickSHCoefficients5, PIVSharedSampler5, BrickTextureUVs, 0) * 2 - 1;
|
|||
|
|
|
|||
|
|
float4 SHDenormalizationScales1 = float4(
|
|||
|
|
1.092548f / 0.282095f,
|
|||
|
|
4.0f * 0.315392f / 0.282095f,
|
|||
|
|
1.092548f / 0.282095f,
|
|||
|
|
2.0f * 0.546274f / 0.282095f);
|
|||
|
|
|
|||
|
|
SHCoefficients1Red = SHCoefficients1Red * AmbientVector.x * SHDenormalizationScales1;
|
|||
|
|
SHCoefficients1Green = SHCoefficients1Green * AmbientVector.y * SHDenormalizationScales1;
|
|||
|
|
SHCoefficients1Blue = SHCoefficients1Blue * AmbientVector.z * SHDenormalizationScales1;
|
|||
|
|
|
|||
|
|
FThreeBandSHVectorRGB IrradianceSH;
|
|||
|
|
// Construct the SH environment
|
|||
|
|
IrradianceSH.R.V0 = float4(AmbientVector.x, SHCoefficients0Red.xyz);
|
|||
|
|
IrradianceSH.R.V1 = float4(SHCoefficients0Red.w, SHCoefficients1Red.xyz);
|
|||
|
|
IrradianceSH.R.V2 = SHCoefficients1Red.w;
|
|||
|
|
|
|||
|
|
IrradianceSH.G.V0 = float4(AmbientVector.y, SHCoefficients0Green.xyz);
|
|||
|
|
IrradianceSH.G.V1 = float4(SHCoefficients0Green.w, SHCoefficients1Green.xyz);
|
|||
|
|
IrradianceSH.G.V2 = SHCoefficients1Green.w;
|
|||
|
|
|
|||
|
|
IrradianceSH.B.V0 = float4(AmbientVector.z, SHCoefficients0Blue.xyz);
|
|||
|
|
IrradianceSH.B.V1 = float4(SHCoefficients0Blue.w, SHCoefficients1Blue.xyz);
|
|||
|
|
IrradianceSH.B.V2 = SHCoefficients1Blue.w;
|
|||
|
|
|
|||
|
|
return IrradianceSH;
|
|||
|
|
}
|
|||
|
|
|
|||
|
|
FThreeBandSHVectorRGB IrradianceSH = GetVolumetricLightmapSH3(VolumetricLightmapBrickTextureUVs);
|
|||
|
|
```
|
|||
|
|
其他还考虑各种透明光照模式,但大致原理是一样的。UV是通过对WorldPosition进行缩放、位移取得(使用Shader全局变量VolumetricLightmapXXXX)。
|
|||
|
|
|
|||
|
|
最后乘以控制因子并累加天光的计算结果后输出,代码如下:
|
|||
|
|
```c++
|
|||
|
|
// Apply indirect lighting scale while we have only accumulated lightmaps
|
|||
|
|
OutDiffuseLighting *= View.IndirectLightingColorScale;
|
|||
|
|
OutSubsurfaceLighting *= View.IndirectLightingColorScale;
|
|||
|
|
|
|||
|
|
float3 SkyDiffuseLighting;
|
|||
|
|
float3 SkySubsurfaceLighting;
|
|||
|
|
GetSkyLighting(MaterialParameters, LightmapVTPageTableResult, GBuffer, DiffuseDir, SkyOcclusionUV, SkyOcclusionDataIndex, VolumetricLightmapBrickTextureUVs, SkyDiffuseLighting, SkySubsurfaceLighting);
|
|||
|
|
|
|||
|
|
OutSubsurfaceLighting += SkySubsurfaceLighting;
|
|||
|
|
|
|||
|
|
// Sky lighting must contribute to IndirectIrradiance for ReflectionEnvironment lightmap mixing
|
|||
|
|
OutDiffuseLighting += SkyDiffuseLighting;
|
|||
|
|
|
|||
|
|
#if HQ_TEXTURE_LIGHTMAP || LQ_TEXTURE_LIGHTMAP || CACHED_VOLUME_INDIRECT_LIGHTING || CACHED_POINT_INDIRECT_LIGHTING || PRECOMPUTED_IRRADIANCE_VOLUME_LIGHTING
|
|||
|
|
OutIndirectIrradiance = Luminance(OutDiffuseLighting);
|
|||
|
|
#endif
|
|||
|
|
```
|
|||
|
|
### GetSkyLighting
|
|||
|
|
```c++
|
|||
|
|
float3 SkyBentNormal = GetVolumetricLightmapSkyBentNormal(SkyOcclusionUV3D);
|
|||
|
|
SkyVisibility = length(SkyBentNormal);
|
|||
|
|
NormalizedBentNormal = SkyBentNormal / max(SkyVisibility, .0001f);
|
|||
|
|
|
|||
|
|
SkyLightingNormal = lerp(NormalizedBentNormal, WorldNormal, BentNormalWeightFactor);
|
|||
|
|
float DotProductFactor = lerp(saturate(dot(NormalizedBentNormal, WorldNormal)), 1, BentNormalWeightFactor);
|
|||
|
|
// Account for darkening due to the geometry term
|
|||
|
|
GeometryTerm = DotProductFactor;
|
|||
|
|
|
|||
|
|
float3 DiffuseLookup = GetEffectiveSkySHDiffuse(SkyLightingNormal) * ResolvedView.SkyLightColor.rgb;
|
|||
|
|
// Apply AO to the sky diffuse
|
|||
|
|
OutDiffuseLighting += DiffuseLookup * (SkyVisibility * GeometryTerm);
|
|||
|
|
```
|
|||
|
|
计算SkyBentNormal=>SkyLightingNormal,之后宏调用GetSkySHDiffuse()。
|
|||
|
|
```c++
|
|||
|
|
float3 GetSkySHDiffuse(float3 Normal)
|
|||
|
|
{
|
|||
|
|
float4 NormalVector = float4(Normal, 1.0f);
|
|||
|
|
float3 Intermediate0, Intermediate1, Intermediate2;
|
|||
|
|
Intermediate0.x = dot(SkyIrradianceEnvironmentMap[0], NormalVector);
|
|||
|
|
Intermediate0.y = dot(SkyIrradianceEnvironmentMap[1], NormalVector);
|
|||
|
|
Intermediate0.z = dot(SkyIrradianceEnvironmentMap[2], NormalVector);
|
|||
|
|
|
|||
|
|
float4 vB = NormalVector.xyzz * NormalVector.yzzx;
|
|||
|
|
Intermediate1.x = dot(SkyIrradianceEnvironmentMap[3], vB);
|
|||
|
|
Intermediate1.y = dot(SkyIrradianceEnvironmentMap[4], vB);
|
|||
|
|
Intermediate1.z = dot(SkyIrradianceEnvironmentMap[5], vB);
|
|||
|
|
|
|||
|
|
float vC = NormalVector.x * NormalVector.x - NormalVector.y * NormalVector.y;
|
|||
|
|
Intermediate2 = SkyIrradianceEnvironmentMap[6].xyz * vC;
|
|||
|
|
|
|||
|
|
// max to not get negative colors
|
|||
|
|
return max(0, Intermediate0 + Intermediate1 + Intermediate2);
|
|||
|
|
}
|
|||
|
|
```
|
|||
|
|
SkyIrradianceEnvironmentMap为全局变量:
|
|||
|
|
`View.SkyIrradianceEnvironmentMap`类型是`StructuredBuffer<float4>, SkyIrradianceEnvironmentMap`
|
|||
|
|
|
|||
|
|
### TWOSIDED_FOLIAGE
|
|||
|
|
双面植被ShaderModel还会额外累加背面的天光GI:
|
|||
|
|
```c++
|
|||
|
|
#if MATERIAL_SHADINGMODEL_TWOSIDED_FOLIAGE
|
|||
|
|
if (GBuffer.ShadingModelID == SHADINGMODELID_TWOSIDED_FOLIAGE)
|
|||
|
|
{
|
|||
|
|
float3 BackfaceDiffuseLookup = GetEffectiveSkySHDiffuse(-WorldNormal) * ResolvedView.SkyLightColor.rgb;
|
|||
|
|
OutSubsurfaceLighting += BackfaceDiffuseLookup * SkyVisibility;
|
|||
|
|
}
|
|||
|
|
#endif
|
|||
|
|
```
|
|||
|
|
## DiffuseIndirectAndAO
|
|||
|
|
1. 渲染RTGI(RenderRayTracingGlobalIllumination)或者SSGI (RenderScreenSpaceDiffuseIndirect),并使用降噪器进行降噪
|
|||
|
|
3. 使用GIPlugin渲染GI效果
|
|||
|
|
4. 渲染RTAO,并使用降噪器进行降噪
|
|||
|
|
5. FDiffuseIndirectCompositePS,将间接照明与AO合到RT上。
|
|||
|
|
6. FAmbientCubemapCompositePS(AmbientCubemap95%是不使用的)
|
|||
|
|
|
|||
|
|
FDiffuseIndirectCompositePS的代码如图,可以看得出就简单的叠加,相关效果的调整也可以加在这里:
|
|||
|
|
```c++
|
|||
|
|
void MainPS(float4 SvPosition : SV_POSITION, out float4 OutColor : SV_Target0)
|
|||
|
|
{
|
|||
|
|
float2 BufferUV = SvPositionToBufferUV(SvPosition);
|
|||
|
|
float2 ScreenPosition = SvPositionToScreenPosition(SvPosition).xy;
|
|||
|
|
|
|||
|
|
// Sample scene textures.
|
|||
|
|
FGBufferData GBuffer = GetGBufferDataFromSceneTextures(BufferUV);
|
|||
|
|
|
|||
|
|
// Sample the ambient occlusion that is dynamically generated every frame.
|
|||
|
|
float DynamicAmbientOcclusion = 1.0f;
|
|||
|
|
#if DIM_APPLY_AMBIENT_OCCLUSION
|
|||
|
|
DynamicAmbientOcclusion = AmbientOcclusionTexture.SampleLevel(AmbientOcclusionSampler, BufferUV, 0).r;
|
|||
|
|
#endif
|
|||
|
|
|
|||
|
|
// Compute the final ambient occlusion to be applied.
|
|||
|
|
float FinalAmbientOcclusion = GBuffer.GBufferAO * DynamicAmbientOcclusion;
|
|||
|
|
|
|||
|
|
OutColor.rgb = 0.0f;
|
|||
|
|
OutColor.a = 1.0f;
|
|||
|
|
|
|||
|
|
// Apply diffuse indirect.
|
|||
|
|
#if DIM_APPLY_DIFFUSE_INDIRECT
|
|||
|
|
{
|
|||
|
|
float3 DiffuseColor = GBuffer.DiffuseColor;
|
|||
|
|
if (UseSubsurfaceProfile(GBuffer.ShadingModelID))
|
|||
|
|
{
|
|||
|
|
DiffuseColor = GBuffer.StoredBaseColor;
|
|||
|
|
}
|
|||
|
|
OutColor.rgb += DiffuseColor * DiffuseIndirectTexture.SampleLevel(DiffuseIndirectSampler, BufferUV, 0).rgb;
|
|||
|
|
}#endif
|
|||
|
|
|
|||
|
|
// Apply AmbientOcclusion to the scene color. since before deferred direct lighting, we assume all lighting in SceneColor to be indirect ligthing
|
|||
|
|
{
|
|||
|
|
float AOMask = (GBuffer.ShadingModelID != SHADINGMODELID_UNLIT);
|
|||
|
|
OutColor.a = lerp(1.0f, FinalAmbientOcclusion, AOMask * AmbientOcclusionStaticFraction);
|
|||
|
|
}}
|
|||
|
|
```
|
|||
|
|
|
|||
|
|
## ReflectionEnvironmentAndSky
|
|||
|
|
这里这么实现会导致材质的Opacity对Transmission的影响不大,没有细节。
|
|||
|
|
```c++
|
|||
|
|
if (GBuffer.ShadingModelID == SHADINGMODELID_SUBSURFACE || GBuffer.ShadingModelID == SHADINGMODELID_PREINTEGRATED_SKIN || GBuffer.ShadingModelID == SHADINGMODELID_TOONSKIN)
|
|||
|
|
{
|
|||
|
|
float3 SubsurfaceColor = ExtractSubsurfaceColor(GBuffer);
|
|||
|
|
// Add subsurface energy to diffuse
|
|||
|
|
DiffuseColor += SubsurfaceColor;
|
|||
|
|
}
|
|||
|
|
```
|
|||
|
|
- [x] 增加Opacity项、NoV项以及一个阈值开关。
|
|||
|
|
|
|||
|
|
#TODO
|
|||
|
|
1. 测试ReflectionEnvironment的效果。
|
|||
|
|
|
|||
|
|
- 一堆判断是否需要计算这个Pass的逻辑
|
|||
|
|
- 判断是否计算动态天光,如果需要则调用RenderDistanceFieldLighting()计算
|
|||
|
|
- 距离场AO RenderDistanceFieldAOScreenGrid
|
|||
|
|
- 天光的胶囊阴影 RenderCapsuleShadowsForMovableSkylight
|
|||
|
|
- 计算各种反射(屏幕空间、Plan、Rtx)
|
|||
|
|
- 计算天光 使用FReflectionEnvironmentSkyLightingPS
|
|||
|
|
- 取得GBuffer的Diffuse与Specular
|
|||
|
|
- 采样AmbientOcclusionTexture来获取AO结果
|
|||
|
|
- 如果APPLY_SKY_SHADOWING开启,则采样距离场来修改WorldNormal来取得BentNormal。
|
|||
|
|
- 如果开启动态天光则进行天光计算(静态估计把结果合并到VLM里了)。调用SkyLightDiffuse()
|
|||
|
|
- **APPLY_SKY_SHADOWING 为true时**,通过`length(BentNormal);` 会计算天光可见性
|
|||
|
|
- 根据AO合并方式,将AO合并。
|
|||
|
|
- 根据ShaderModel计算Diffuse
|
|||
|
|
- 计算最后的天光结果并且返回
|
|||
|
|
- 使用LightAccumulator,将光照结果累加到一起。
|
|||
|
|
- 调用ReflectionEnvironment()计算
|
|||
|
|
- float IndirectIrradiance = GBuffer.IndirectIrradiance;
|
|||
|
|
- 如果是静态天光:IndirectIrradiance += GetDynamicSkyIndirectIrradiance(BentNormal, GBuffer.WorldNormal);
|
|||
|
|
- 计算各种反射
|
|||
|
|
- SSR
|
|||
|
|
- Color.rgb += PreExposure * GatherRadiance(Color.a, WorldPosition, R, GBuffer.Roughness, BentNormal, IndirectIrradiance, GBuffer.ShadingModelID, NumCulledReflectionCaptures, DataStartIndex);
|
|||
|
|
- 计算清漆 或者 Color.rgb *= EnvBRDF( SpecularColor, GBuffer.Roughness, NoV );
|
|||
|
|
|
|||
|
|
### SkyLightDiffuse
|
|||
|
|
```c++
|
|||
|
|
//设定的天光颜色乘以HDR图球谐采样颜色
|
|||
|
|
float3 DiffuseLookup = GetSkySHDiffuse(SkyLightingNormal) * View.SkyLightColor.rgb;
|
|||
|
|
|
|||
|
|
//lerp(DiffuseColor,DiffuseLookup,SkyVisibility),不开DFAO,DotProductFactor=1。
|
|||
|
|
Lighting += ((ScalarFactors * DotProductFactor) * DiffuseLookup + (1 - SkyVisibility) * OcclusionTintAndMinOcclusion.xyz) * DiffuseColor;
|
|||
|
|
```
|
|||
|
|
看的出天光的亮部区域主要由于天光颜色与HDR图提供,暗部为GetSkySHDiffuse()计算所得(Diffuse与Transmission)。
|
|||
|
|
|
|||
|
|
SkyVisibility会受到DFAO与SSAO的影响(AO越黑代表SkyVisibility 值越低),源码里建议:开启DFAO之后把SSAO关了。
|
|||
|
|
至于没有没有效果,只需要在后处理盒子中调节AO亮度即可。另一个参数天光里的`OcclusionTintAndMinOcclusion`也就是天光距离场AO的`Occlusion Tint`选项,开启距离场AO后才能调节。
|
|||
|
|
|
|||
|
|
>PS.个人认为SSAO适合角色,DFAO适合当橘色离场景模型较近时模拟出暗部效果。源码里有提示`Occlusion Tint`可以作为一种照明方法,所以我想到了***可以使用DFAO提亮暗部,SSAO增加暗部细节***,测试下来感觉很适合角色。
|
|||
|
|
|
|||
|
|
### ReflectionEnvironment
|
|||
|
|
```c++
|
|||
|
|
float4 SSR = Texture2DSample(ScreenSpaceReflectionsTexture, ScreenSpaceReflectionsSampler, BufferUV);
|
|||
|
|
Color.rgb = SSR.rgb;
|
|||
|
|
Color.a = 1 - SSR.a;
|
|||
|
|
|
|||
|
|
Color.rgb += PreExposure * GatherRadiance(Color.a, WorldPosition, R, GBuffer.Roughness, BentNormal, IndirectIrradiance, GBuffer.ShadingModelID, NumCulledReflectionCaptures, DataStartIndex);
|
|||
|
|
Color.rgb *= EnvBRDF( SpecularColor, GBuffer.Roughness, NoV );
|
|||
|
|
|
|||
|
|
// 将NaN转化为黑色,将负数颜色转化为黑色。
|
|||
|
|
return -min(-Color.rgb, 0.0);
|
|||
|
|
```
|
|||
|
|
|
|||
|
|
GatherRadiance:计算反射球的场景捕获或者ReflectionCubeMap(ImageBaseReflection)与天光的HDR贴图的融合的照明效果(反射)。
|
|||
|
|
|
|||
|
|
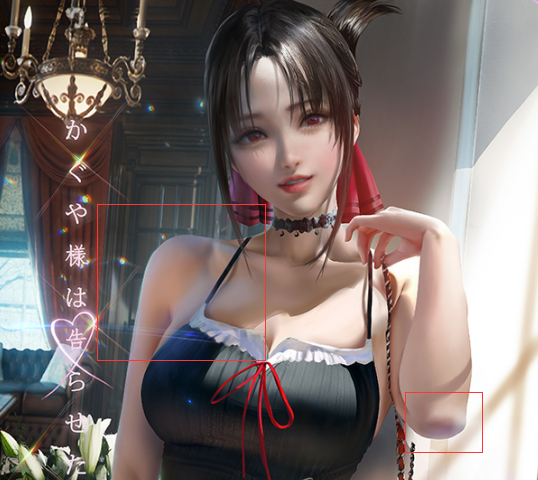
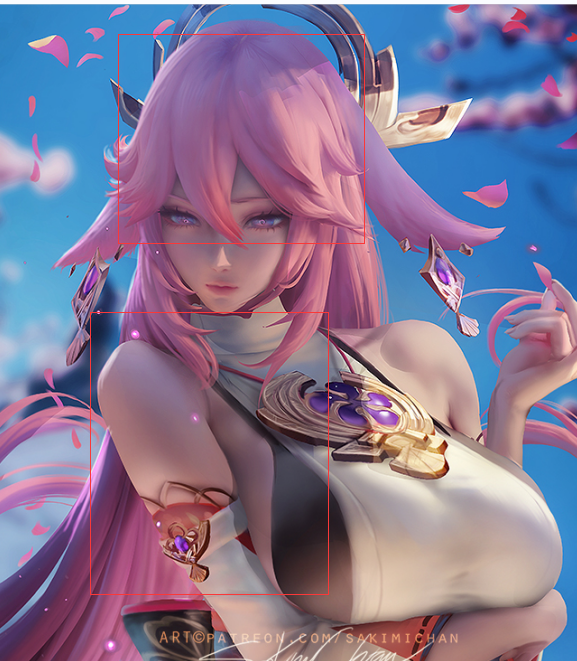
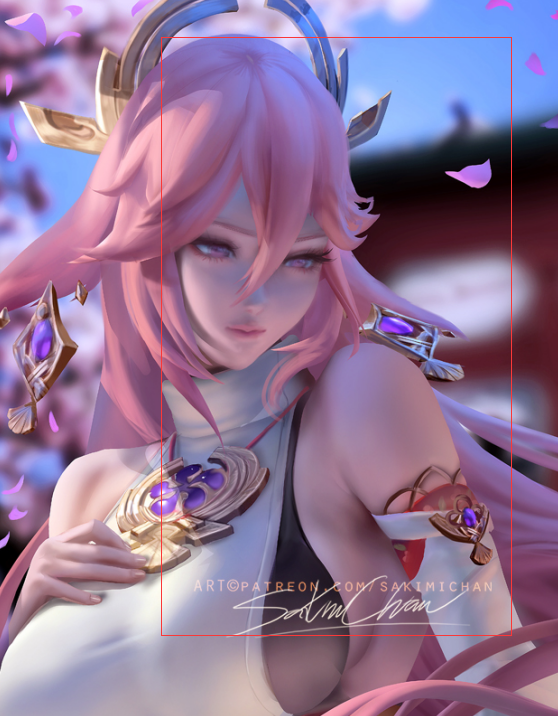
sakimichan的部分画作有这种天光产生的效果:
|
|||
|
|
|
|||
|
|
|
|||
|
|
|
|||
|
|
|
|||
|
|
大致推断是等亮度处于 一个范围(Min、Max)* AO大于XX 时,提升ReflectionEnvironment()的效果。使用SceneColorTexture(灯光渲染后的RT)亮度作为Mask,而非之前尝试的IBL亮度。
|
|||
|
|
> 实际经过测试,因为暗部的亮度范围有限,很难做出精细的Mask(对光照环境是有要求的),而且PreExposure是个浮动数值,Mask区域会不稳定。
|
|||
|
|
|
|||
|
|
|
|||
|
|
|
|||
|
|
|
|||
|
|
|
|||
|
|
这里用了一个0.01的Smooth以及5的Multiper:实际上不会那么明显。
|
|||
|
|
|
|||
|
|
|
|||
|
|
|
|||
|
|
PS.`是否加入NoV作为另一个Mask有待考虑。`
|
|||
|
|
|
|||
|
|
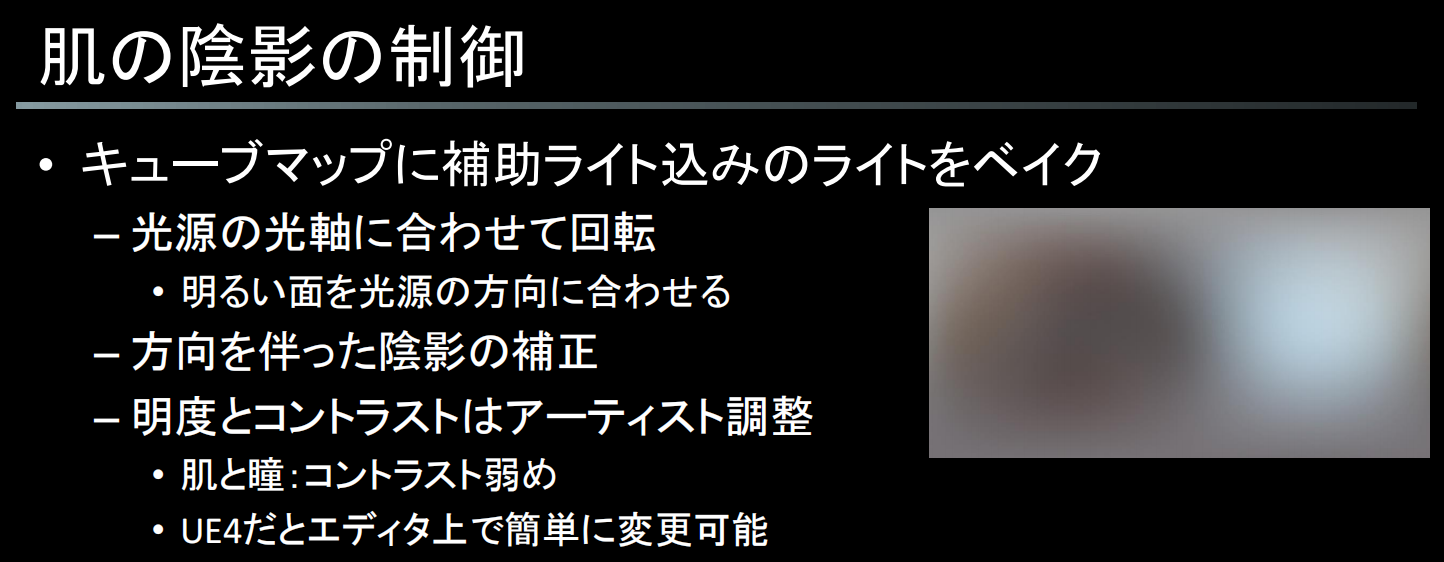
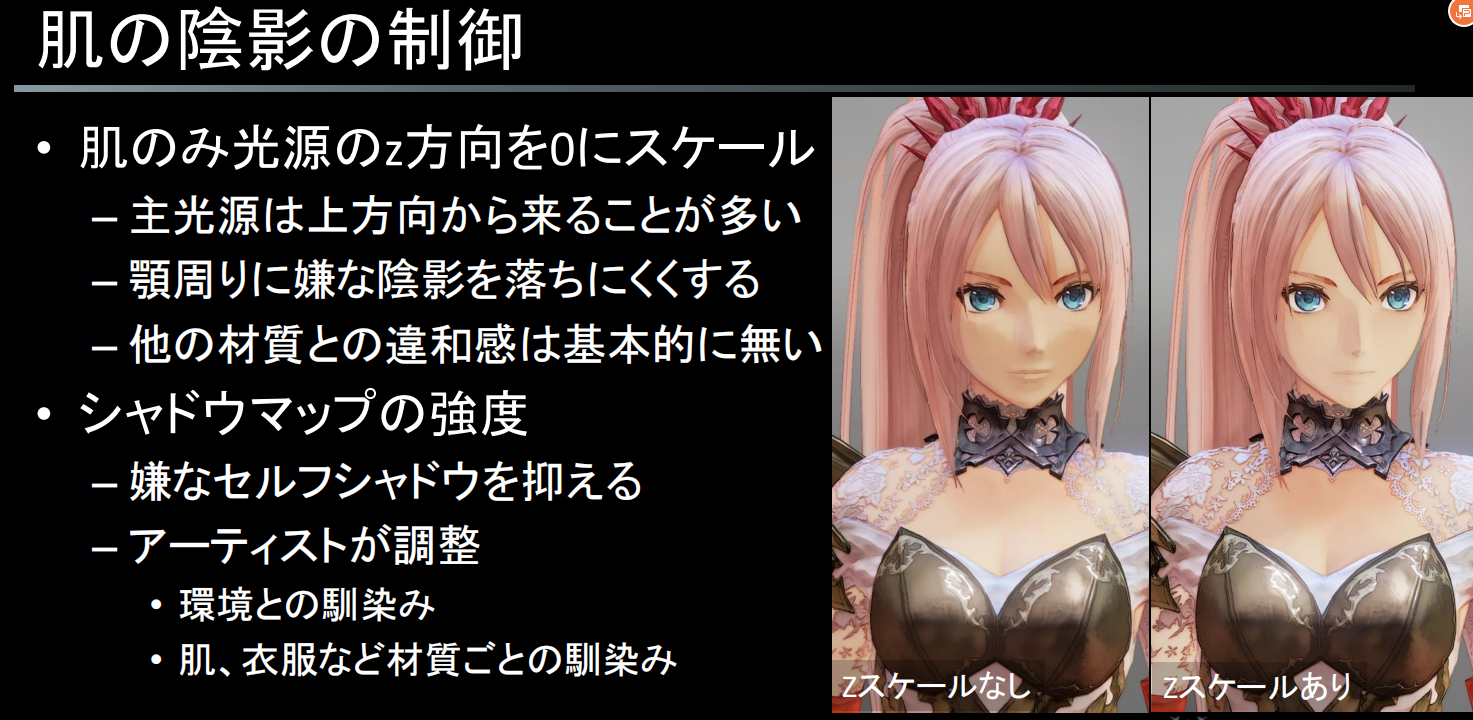
#### 破晓传说中控制皮肤阴影效果
|
|||
|
|
控制皮肤的阴影。
|
|||
|
|
|
|||
|
|
将包括辅助光在内的灯光烘烤成立方体地图(制作光照环境HDR贴图)
|
|||
|
|
- 旋转以配合光源的光轴
|
|||
|
|
- 将光面与光源的方向对齐
|
|||
|
|
- 有方向性的正确遮蔽
|
|||
|
|
- 亮度和对比度:艺术家调整的
|
|||
|
|
- 皮肤和眼睛:对比度低
|
|||
|
|
- 在UE4中,这可以很容易地在编辑器中改变。
|
|||
|
|
|
|||
|
|
|
|||
|
|
|
|||
|
|
|
|||
|
|
## Fake额发阴影
|
|||
|
|

|
|||
|
|
|
|||
|
|
|
|||
|
|
## 后处理
|
|||
|
|
### 其他游戏用到的后处理效果
|
|||
|
|
|
|||
|
|
### Bloom(Glow效果):
|
|||
|
|
>注意半透明材质遮挡后的效果是否正常。
|
|||
|
|
|
|||
|
|
- 筛选足够亮的区域(阈值),再进行模糊处理后,在通过Lighten(柔光)的方式来叠加结果。
|
|||
|
|
- 处于基础光照外,还需要加上些许边缘光,即光源光效果也需要加入到Bloom中
|
|||
|
|
-
|
|||
|
|
|
|||
|
|
#### Bloom是什么?
|
|||
|
|
https://zhuanlan.zhihu.com/p/76505536
|
|||
|
|
|
|||
|
|
**为什么会有Bloom**
|
|||
|
|
图片常见格式有jpg,png等,这类图片我们称为LDR(低动态范围图像)。这类图片只能记录RGB 0-255,对应0-1。也就是说,RGB只在0-1之间的图片,称为LDR。相反,如果图片能低于0或高于1,我们称之为HDR(高动态范围图像)。能存HDR的图片格式有hdr/tif/exr等。
|
|||
|
|
- **思考一下,我们的真实世界是一个色彩无限丰富的HDR世界。**
|
|||
|
|
- **我们常用的显示器,手机,摄像机等设备,不管输入还是输出,信息几乎是LDR。**
|
|||
|
|
|
|||
|
|
超出LDR的颜色,在照片中存储不到,所以就直接曝成纯色。
|
|||
|
|
|
|||
|
|
- **眼睛**与相机成像方式相同,可以看作自动档的相机。
|
|||
|
|
眼睛内存在有 **锥体/棒体** 两种感光细胞,分别对 **亮/暗** 更敏感。在黑暗的室内猛然看向窗户,会看到一个全白的户外,注视一段时间才缓缓恢复,这便是两种感光细胞在切换工作。
|
|||
|
|
关于眼睛对亮度的反应,还有一个叫 **白亮度阈** 和 **黑亮度阈** 的东西。有兴趣的可以了解一下。
|
|||
|
|
|
|||
|
|
|
|||
|
|
|
|||
|
|
|
|||
|
|
#### 卡通Bloom与PBR Bloom的区别
|
|||
|
|
使用PBR的方式来处理Bloom,很容易导致泛光部分发白。而我们需要的其实是一个带颜色的光晕。
|
|||
|
|
|
|||
|
|
|
|||
|
|
这个发光其实非常的PBR,但是不符合要求。所以我们需要向屏幕缓冲写入一个专门Bloom系数来控制Bloom强度,这样就可以让任何颜色的物体泛光了(但根据画风,一般也会参考颜色的亮度值,这样Bloom系数就只需要一个修正用的值而非贴图)
|
|||
|
|
这里有两个方法:
|
|||
|
|
- 一个是MRT,思路很简单,但需要额外申请一个RGBA(RT每次必须读取至少32位),但却只用了其中8bit,太浪费了。
|
|||
|
|
- 另一个方法就是传统的写入alpha通道的做法。但这个做法在AlphaBlend的情况下,由于Alpha值也需要写入Alpha通道,就和Bloom系数冲突了。修正它的方法是使用双PASS,一个专门写RGB通道,一个专门写A通道来解决这个问题。
|
|||
|
|
|
|||
|
|
#### FlashYiYi的方案
|
|||
|
|
>一般会使用一个GBuffer通道来储存一个Bloom的缩放值。
|
|||
|
|
>具体实现的时候,最佳方案其实是准备一个单独的Half通道以储存一个HDR范围的亮度值,并在frag中将原始颜色的亮度值计算出并存入。只有这样,才能保证Alpha Blend, Additive,以及各种特殊混合模式下的Bloom值的正确性。
|
|||
|
|
|
|||
|
|
放弃透明物体的Bloom值自定义功能,透明物体阶段并不写入Bloom值,这样也节约了带宽。而为了最终计算Bloom结果正确,必须将透明物体和不透明物体分别渲染,然后在Bloom阶段重新组合。(为什么必须这样解释起来很麻烦,信我就行了)
|
|||
|
|
|
|||
|
|
这个分离透明物体渲染的功能UE本来就提供了,只需要修改Bloom部分的RT组合,实现还是很简单的。而且通过配置r.SeparateTranslucencyScreenPercentage还可以获得半透物体降分辨率功能,还可以根据帧率自动进行,基本上不会不开,分离渲染导致的性能代价也就无所谓了。
|
|||
|
|
|
|||
|
|
#### 崩坏三
|
|||
|
|
Realis Bloom
|
|||
|
|
- 高光提取,色相饱和度偏移
|
|||
|
|
- 多级高斯
|
|||
|
|
|
|||
|
|
大概率和UE4的方式是一样的。
|
|||
|
|
|
|||
|
|
- 深度Mask
|
|||
|
|
- 基于距离的亮度
|
|||
|
|
|
|||
|
|
|
|||
|
|
接下来让我们看看bloom的实现,整个场景如果开启HDR会使用 fp16格式的Render target,然后
|
|||
|
|
下采样到原始大小的1/4大小以便之后的后处理流程使用。
|
|||
|
|
首先,我们需要指定一个亮度阈值来提取图像中的高亮区域,实现方法也并不复杂,只需从源像素减
|
|||
|
|
去阈值,得到的结构就是提取后的高亮度区域,叠加这层内容能使结果看起来更具对比并且色彩鲜
|
|||
|
|
艳。接下来,我们产生4个大小依次递半的Render target,并将其内容应用半径逐渐增大的高斯模
|
|||
|
|
糊。最后我们将这些模糊后的结果合并起来,以获得最终的bloom效果。
|
|||
|
|
从下面最终的效果图我们可以看到,bloom效果不仅起到用来表达高亮区域的视觉效果,还对整个
|
|||
|
|
|
|||
|
|
图像的色彩中起着明显的润色作用。
|
|||
|
|
|
|||
|
|
#### 原神的Bloom
|
|||
|
|
原神的bloom……bloom的具体方案其实早就没啥可说的了,只有卡通渲染控制bloom强度这个事情可谈。原神肯定不是按物理方式处理bloom的,需要在gbuffer写入参数来控制bloom的强度。但有个现象是,他们有些明明是黄色树叶的树木,却能打出红色的bloom来……而且明显不是调色出来的结果,因为是逐物体的。这说明他们bloom的颜色都是可以变换的。这就需要在gbuffer里输出更多的参数(直接输出bloom颜色或者映射lut)。但做到这样的必要性真的有吗?
|
|||
|
|
|
|||
|
|
而我觉得,这更像是在一般bloom外面叠了个glow。这并不用重新计算一次模糊,直接在用于计算bloom的那张rt上画上额外的颜色,多级模糊后再叠回没有画额外颜色的那张图,这种自定义bloom的方式其实比起加通道更省(但因为有额外pass,只能少量物体用)
|
|||
|
|
|
|||
|
|
抓帧后都能明白。
|
|||
|
|
|
|||
|
|
#### Image Effects扩展——基于深度的Bloom
|
|||
|
|
在复杂场景下,**分相机Bloom也存在问题,**当把bloom相机的render target跟主相机分开,bloom相机便没有了主相机的depth buffer(color buffer和depth buffer组成render target),这样会导致bloom相机绘制到了被遮挡的内容。见下图:
|
|||
|
|
|
|||
|
|
|
|||
|
|
|
|||
|
|
左图立方体本未被角色遮挡,右图为正确的显示。解决方式是使用source的depth buffer,OnRenderImage函数中:
|
|||
|
|
```text
|
|||
|
|
...
|
|||
|
|
GlowCamera.SetTargetBuffers(glowTexture.colorBuffer, source.depthBuffer);
|
|||
|
|
GlowCamera.Render();
|
|||
|
|
...
|
|||
|
|
```
|
|||
|
|
GlowCamera.SetTargetBuffers函数设置颜色输出到glowTexture的colorBuffer,深度输出到source.depthBuffer,为主相机的深度buffer。这样glow模型绘制时根据ZTest和ZWrite设置(Opaque默认ZTest LEqual, ZWrite On)更新主相机的深度buffer。
|
|||
|
|
|
|||
|
|
|
|||
|
|
#### 【Unity URP】一次对卡通渲染仿动画摄影的探索
|
|||
|
|
https://zhuanlan.zhihu.com/p/363790714
|
|||
|
|
|
|||
|
|
#### UE中的Bloom实现
|
|||
|
|
逻辑位于PostProcessing.cpp的AddBloomPass() =>AddGaussianBlurPass() 。
|
|||
|
|
Bloom方法分为Standard(标准,Sum of Gaussian formulation)、 convolution(卷积,Fast Fourier Transform Image based convolution)
|
|||
|
|
|
|||
|
|
可通过PostProcessVolumn来设置BloomXSize、BloomXTint。质量需要通过命令还设置,主要影响高斯模糊的执行次数。
|
|||
|
|
```c++
|
|||
|
|
for (uint32 StageIndex = 0, SourceIndex = BloomQualityCountMax - 1; StageIndex < BloomStageCount; ++StageIndex, --SourceIndex)
|
|||
|
|
{
|
|||
|
|
const FBloomStage& BloomStage = BloomStages[StageIndex];
|
|||
|
|
|
|||
|
|
if (BloomStage.Size > SMALL_NUMBER)
|
|||
|
|
{ FGaussianBlurInputs PassInputs;
|
|||
|
|
PassInputs.NameX = TEXT("BloomX");
|
|||
|
|
PassInputs.NameY = TEXT("BloomY");
|
|||
|
|
PassInputs.Filter = Inputs.SceneDownsampleChain->GetTexture(SourceIndex);
|
|||
|
|
PassInputs.Additive = Bloom;
|
|||
|
|
PassInputs.CrossCenterWeight = CrossCenterWeight;
|
|||
|
|
PassInputs.KernelSizePercent = BloomStage.Size * Settings.BloomSizeScale;
|
|||
|
|
PassInputs.TintColor = BloomStage.Tint * TintScale;
|
|||
|
|
|
|||
|
|
Bloom = AddGaussianBlurPass(GraphBuilder, View, PassInputs);
|
|||
|
|
}
|
|||
|
|
}
|
|||
|
|
```
|
|||
|
|
大致流程为:从下采样链中获取对应的SceneColorTexture下采样结果 => X轴Y轴各做一次高斯模糊 => 叠加结果。
|
|||
|
|
|
|||
|
|
默认使用PixelShader,可使用`r.PostProcessing.PreferCompute`将其切换为ComputeShader。Shader位于FilterPixelShader.usf。
|
|||
|
|
|
|||
|
|
## 笔触化
|
|||
|
|
|
|||
|
|

|
|||
|
|
|
|||
|
|
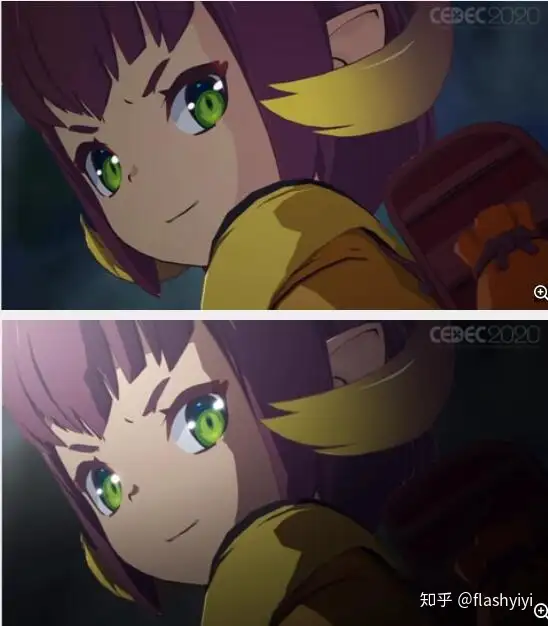
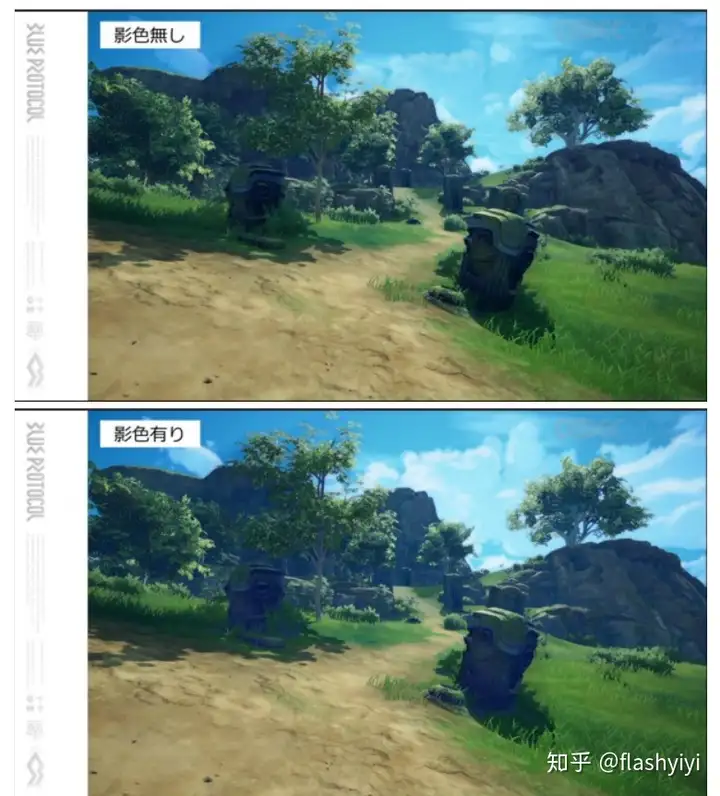
插画风格渲染的另一个重要因素是使用纹理笔触。我们可以使用不同的笔触纹理图案以获得不同的着
|
|||
|
|
色风格。对于每个笔刷纹理,我们有4个通道可以存储代表不同方向的笔刷图案,混合使用这些笔刷
|
|||
|
|
可以获得更丰富的笔刷变化。右边的二张对比图中,使用笔触纹理的有着更多手绘的感觉。
|
|||
|
|
|
|||
|
|
### SunFlare
|
|||
|
|
|
|||
|
|
算法:https://www.shadertoy.com/view/MlyfWd
|
|||
|
|
|
|||
|
|
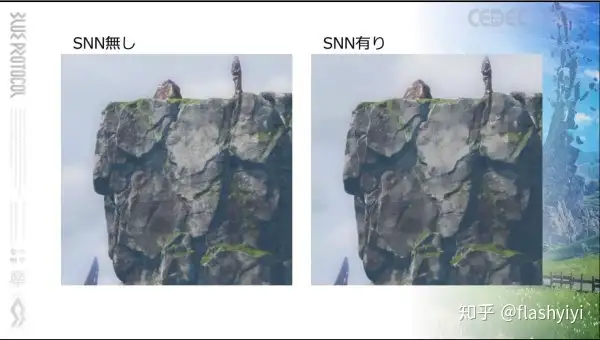
SNN和Kuwahara的对比,左边那个是SNN。
|
|||
|
|
EN,72采样,计算量可以忽略,跑应该还是能跑。
|
|||
|
|
旁边的Kuwahara应该是个类似的算法,64采样。
|
|||
|
|
可以考虑降低下width。
|
|||
|
|
|
|||
|
|
|
|||
|
|
|
|||
|
|
### 水彩过滤器SNN
|
|||
|
|
破晓传说使用了:
|
|||
|
|
- 自定义SNN + 锐化 + 轮廓
|
|||
|
|
- 自定义SNN
|
|||
|
|
- 类似于手绘的模糊,模糊和粉碎的表面
|
|||
|
|
- 锐化+轮廓(法线)
|
|||
|
|
- 增加精细的信息量
|
|||
|
|
- 什么是SNN过滤器?
|
|||
|
|
- 对角线像素的比较和平均化
|
|||
|
|
- 良好的像素混合和噪音
|
|||
|
|
- 需要在模糊度、过滤器大小、负载等方面进行调整。
|
|||
|
|
|
|||
|
|
SNN的自定义元素
|
|||
|
|
- 引入混合加权
|
|||
|
|
- 双边加权(以抵消模糊的影响)。
|
|||
|
|
- 过滤器形状
|
|||
|
|
- 通过轮廓强度调整滤波宽度
|
|||
|
|
- 水平或垂直倾斜,强度,等等。
|
|||
|
|
- 过滤强度
|
|||
|
|
- 根据相机的距离而改变
|
|||
|
|
- 负载措施
|
|||
|
|
- 独立的水平和垂直过滤器的实施
|
|||
|
|
- 7+7采样数
|
|||
|
|
|
|||
|
|
## 厚涂头发渲染
|
|||
|
|
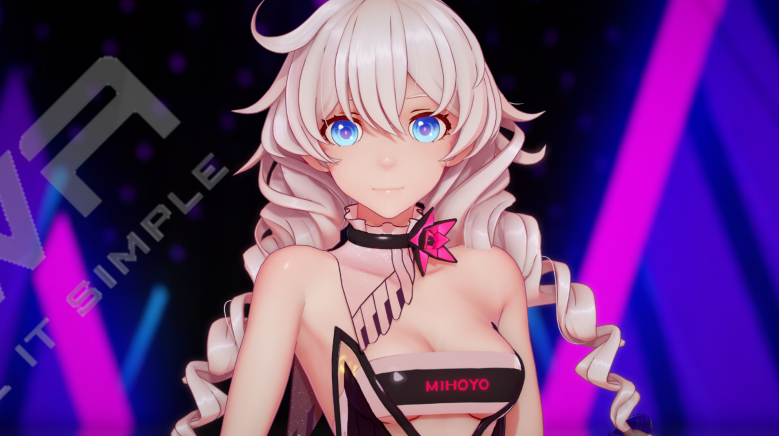
目前可参考的就只有米哈游的效果。
|
|||
|
|
|
|||
|
|
|
|||
|
|
|
|||
|
|
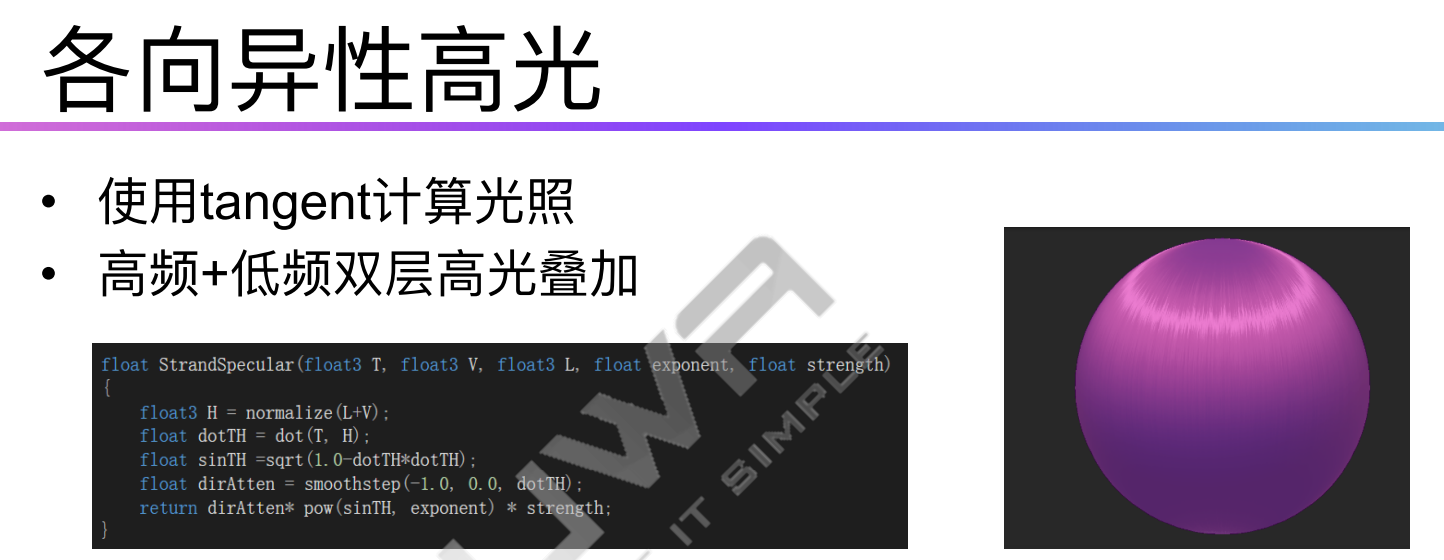
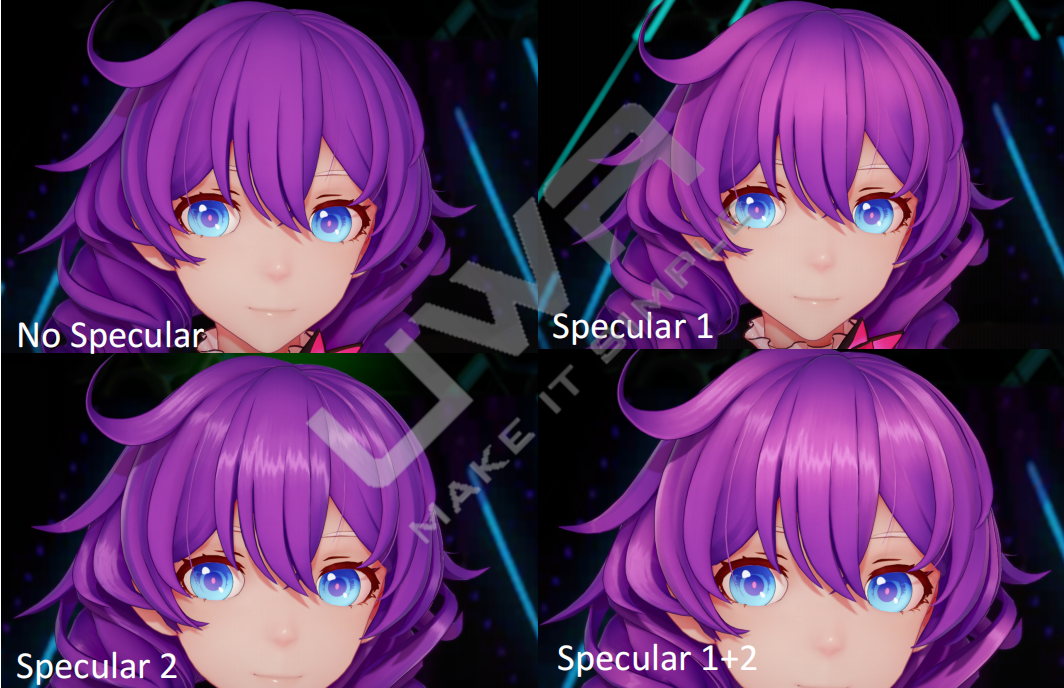
### 各项异性高光
|
|||
|
|
- 使用**2种或者多种**各向异性高光叠加输出结果。
|
|||
|
|
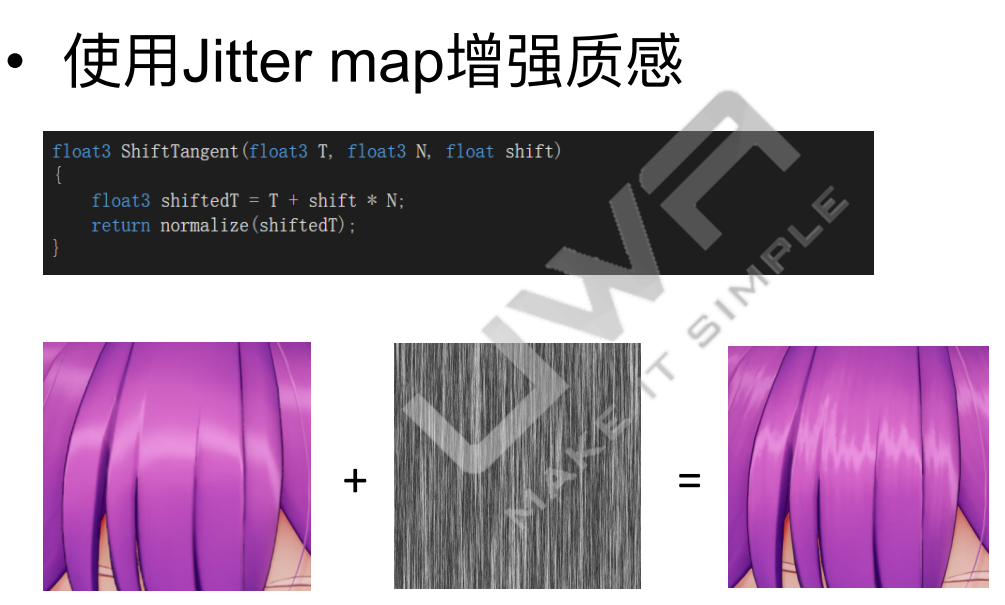
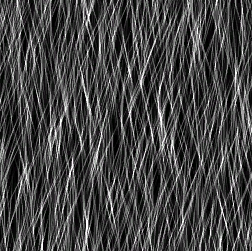
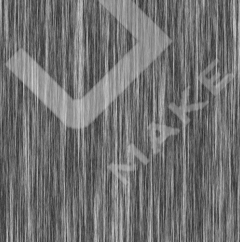
- 使用JitterMap提升质感
|
|||
|
|
|
|||
|
|
|
|||
|
|
|
|||
|
|
|
|||
|
|
|
|||
|
|
|
|||
|
|
### 实现笔记
|
|||
|
|
1. 首先目前使用的各项异性贴图并不适合制作卡通渲染那种头发高光效果,需要使用比较直的头发生成的各项异性贴图。
|
|||
|
|
|
|||
|
|
|
|||
|
|
|
|||
|
|
- kajiya-kay Model解读:https://zhuanlan.zhihu.com/p/520461565
|
|||
|
|
- 米哈游头发各向异性高光曲线制作:https://zhuanlan.zhihu.com/p/362405680
|
|||
|
|
|
|||
|
|
PS.其实各向异性贴图的每一行就可以看成一条各项异性曲线。
|
|||
|
|
|
|||
|
|
## 程序化眼睛
|
|||
|
|
插画参考:https://www.zhihu.com/question/277934050/answer/2573919088
|
|||
|
|
|
|||
|
|
|
|||
|
|
## SSS-SG
|
|||
|
|
https://zhuanlan.zhihu.com/p/139836594
|
|||
|
|
|
|||
|
|
### **2.4 与SSS何干?**
|
|||
|
|
1. SG可以朝向任意方向,也就是 μ 表示的波瓣轴向。这样就可以与场景中的punctual light(精确光源)完美对齐。
|
|||
|
|
2. SG的 λ (锐度)参数可以是任意数值,这样可以表示不同的滤波参数,包括很窄的滤波核。
|
|||
|
|
3. SG很好做归一化(球面的SG积分为1),可以保证能量守恒。
|
|||
|
|
4. 两个SG相乘可以得到另一个SG,意味着可以用一个SG作为滤波核,与代表光源的SG进行相乘得到另一个SG,这个SG则代表预积分的光照信息。
|
|||
|
|
5. SG已经有比较好的近似漫反射光照的方式。([SG系列第三篇](https://link.zhihu.com/?target=https%3A//cuihongzhi1991.github.io/blog/2020/05/03/sg03/))
|
|||
|
|
|
|||
|
|
```cpp
|
|||
|
|
float3 diffuse = nDotL;
|
|||
|
|
if(EnableSSS)
|
|||
|
|
{
|
|||
|
|
// Represent the diffusion profiles as spherical gaussians
|
|||
|
|
SG redKernel = MakeNormalizedSG(lightDir, 1.0f / max(ScatterAmt.x, 0.0001f));
|
|||
|
|
SG greenKernel = MakeNormalizedSG(lightDir, 1.0f / max(ScatterAmt.y, 0.0001f));
|
|||
|
|
SG blueKernel = MakeNormalizedSG(lightDir, 1.0f / max(ScatterAmt.z, 0.0001f));
|
|||
|
|
|
|||
|
|
// Compute the irradiance that would result from convolving a punctual light source
|
|||
|
|
// with the SG filtering kernels
|
|||
|
|
diffuse = float3(SGIrradianceFitted(redKernel, normal).x,
|
|||
|
|
SGIrradianceFitted(greenKernel, normal).x,
|
|||
|
|
SGIrradianceFitted(blueKernel, normal).x);
|
|||
|
|
}
|
|||
|
|
|
|||
|
|
float3 lightingResponse = diffuse * LightIntensity * DiffuseAlbedo * InvPi;
|
|||
|
|
```
|
|||
|
|
```cpp
|
|||
|
|
// SG Kernel
|
|||
|
|
FSphericalGaussian MakeNormalizedSG(float3 LightDir, half Sharpness, half3 LightIntensity)
|
|||
|
|
{
|
|||
|
|
// 归一化的SG
|
|||
|
|
SphericalGaussian SG;
|
|||
|
|
SG.Axis = float3(0, 1, 0); // 任意方向
|
|||
|
|
SG.Sharpness = Sharpness; // (1 / ScatterAmt.element)
|
|||
|
|
SG.Amplitude = SG.Sharpness / ((2 * PI) - (2 * PI) * exp(-2 * SG.Sharpness)); // 归一化处理
|
|||
|
|
|
|||
|
|
// 对齐轴向,乘上光源强度(颜色)
|
|||
|
|
SG.Axis = LightDir;
|
|||
|
|
SG.Amplitude *= LightIntensity;
|
|||
|
|
return SG;
|
|||
|
|
}
|
|||
|
|
```
|
|||
|
|
```cpp
|
|||
|
|
float3 SGIrradianceFitted(in SG lightingLobe, in float3 normal)
|
|||
|
|
{
|
|||
|
|
const float muDotN = dot(lightingLobe.Axis, normal);
|
|||
|
|
const float lambda = lightingLobe.Sharpness;
|
|||
|
|
|
|||
|
|
const float c0 = 0.36f;
|
|||
|
|
const float c1 = 1.0f / (4.0f * c0);
|
|||
|
|
|
|||
|
|
float eml = exp(-lambda);
|
|||
|
|
float em2l = eml * eml;
|
|||
|
|
float rl = rcp(lambda);
|
|||
|
|
|
|||
|
|
float scale = 1.0f + 2.0f * em2l - rl;
|
|||
|
|
float bias = (eml - em2l) * rl - em2l;
|
|||
|
|
|
|||
|
|
float x = sqrt(1.0f - scale);
|
|||
|
|
float x0 = c0 * muDotN;
|
|||
|
|
float x1 = c1 * x;
|
|||
|
|
|
|||
|
|
float n = x0 + x1;
|
|||
|
|
|
|||
|
|
float y = saturate(muDotN);
|
|||
|
|
if(abs(x0) <= x1)
|
|||
|
|
y = n * n / x;
|
|||
|
|
|
|||
|
|
float result = scale * y + bias;
|
|||
|
|
|
|||
|
|
return result;
|
|||
|
|
}
|
|||
|
|
```
|
|||
|
|
|
|||
|
|
|
|||
|
|
## 预积分贴图
|
|||
|
|
公式参考GPU GEM1
|
|||
|
|
https://github.com/QianMo/Game-Programmer-Study-Notes/tree/master/Content/%E3%80%8AGPU%20Gems%201%E3%80%8B%E5%85%A8%E4%B9%A6%E6%8F%90%E7%82%BC%E6%80%BB%E7%BB%93#42-%E7%AE%80%E5%8D%95%E7%9A%84%E6%95%A3%E5%B0%84%E8%BF%91%E4%BC%BCsimple-scattering-approximations
|
|||
|
|
|
|||
|
|
```c++
|
|||
|
|
float4 GenerateSkinLUT(float2 P : POSITION) : COLOR
|
|||
|
|
{
|
|||
|
|
float wrap = 0.2;
|
|||
|
|
float scatterWidth = 0.3;
|
|||
|
|
float4 scatterColor = float4(0.15, 0.0, 0.0, 1.0);
|
|||
|
|
float shininess = 40.0;
|
|||
|
|
float NdotL = P.x * 2 - 1; // remap from [0, 1] to [-1, 1]
|
|||
|
|
float NdotH = P.y * 2 - 1;
|
|||
|
|
float NdotL_wrap = (NdotL + wrap) / (1 + wrap); // wrap lighting
|
|||
|
|
float diffuse = max(NdotL_wrap, 0.0);
|
|||
|
|
|
|||
|
|
// 在从明到暗的转换中添加颜色色调(add color tint at transition from light to dark)
|
|||
|
|
|
|||
|
|
float scatter = smoothstep(0.0, scatterWidth, NdotL_wrap) * smoothstep(scatterWidth * 2.0, scatterWidth, NdotL_wrap);
|
|||
|
|
|
|||
|
|
float specular = pow(NdotH, shininess);
|
|||
|
|
if (NdotL_wrap <= 0) specular = 0;
|
|||
|
|
|
|||
|
|
float4 C;
|
|||
|
|
C.rgb = diffuse + scatter * scatterColor;
|
|||
|
|
C.a = specular;
|
|||
|
|
|
|||
|
|
return C;
|
|||
|
|
}
|
|||
|
|
|
|||
|
|
// 使用查找表着色皮肤(Shade skin using lookup table)
|
|||
|
|
half3 ShadeSkin(sampler2D skinLUT,
|
|||
|
|
half3 N,
|
|||
|
|
half3 L,
|
|||
|
|
half3 H,
|
|||
|
|
half3 diffuseColor,
|
|||
|
|
half3 specularColor) : COLOR
|
|||
|
|
|
|||
|
|
{
|
|||
|
|
half2 s;
|
|||
|
|
s.x = dot(N, L);
|
|||
|
|
s.y = dot(N, H);
|
|||
|
|
half4 light = tex2D(skinLUT, s * 0.5 + 0.5);
|
|||
|
|
|
|||
|
|
return diffuseColor * light.rgb + specularColor * light.a;
|
|||
|
|
}
|
|||
|
|
```
|
|||
|
|
|
|||
|
|
## 曲率计算
|
|||
|
|
对马鬼之岛的Skin新方法总结:
|
|||
|
|
- New way of thinking about pre-integrated skin shading
|
|||
|
|
- Use linear scattering profile/**cylindrical** integration for punctual light LUT generation
|
|||
|
|
- Radial profile with **spherical** integration for SH lighting LUT
|
|||
|
|
- Importance of directional curvature for improved accuracy
|
|||
|
|
|
|||
|
|
代码来自对马鬼之岛:https://blog.selfshadow.com/publications/s2020-shading-course/patry/slides/index.html#/105
|
|||
|
|
```c++
|
|||
|
|
float CurvatureFromLight(
|
|||
|
|
float3 tangent,
|
|||
|
|
float3 bitangent,
|
|||
|
|
float3 curvTensor,
|
|||
|
|
float3 lightDir)
|
|||
|
|
{
|
|||
|
|
// Project light vector into tangent plane
|
|||
|
|
|
|||
|
|
float2 lightDirProj = float2(dot(lightDir, tangent), dot(lightDir, bitangent));
|
|||
|
|
|
|||
|
|
// NOTE (jasminp) We should normalize lightDirProj here in order to correctly
|
|||
|
|
// calculate curvature in the light direction projected to the tangent plane.
|
|||
|
|
// However, it makes no perceptible difference, since the skin LUT does not vary
|
|||
|
|
// much with curvature when N.L is large.
|
|||
|
|
|
|||
|
|
float curvature = curvTensor.x * GSquare(lightDirProj.x) +
|
|||
|
|
2.0f * curvTensor.y * lightDirProj.x * lightDirProj.y +
|
|||
|
|
curvTensor.z * GSquare(lightDirProj.y);
|
|||
|
|
|
|||
|
|
return curvature;
|
|||
|
|
}
|
|||
|
|
```
|
|||
|
|
|
|||
|
|
|
|||
|
|
# UE5 版本
|
|||
|
|
## Lumen
|
|||
|
|
UE5的Lumen代替了Skylight部分的渲染逻辑。
|