445 lines
21 KiB
Markdown
445 lines
21 KiB
Markdown
|
|
# 实用库
|
|||
|
|
`#include "/Engine/Private/Random.ush"`
|
|||
|
|
`#include "/Engine/Private/SobolRandom.ush"`
|
|||
|
|
|
|||
|
|
# 眼睛
|
|||
|
|
眼睛焦散:
|
|||
|
|
|
|||
|
|
## 凹模型
|
|||
|
|
直接贴图即可。
|
|||
|
|
折射
|
|||
|
|
模型高光
|
|||
|
|
|
|||
|
|
## 凸模型
|
|||
|
|
1. 使用视差贴图来控制瞳孔效果 + 折射模拟
|
|||
|
|
```
|
|||
|
|
float2 viewL = mul(viewW, (float3x2) worldInverse);
|
|||
|
|
float2 offset = height * viewL;
|
|||
|
|
offset.y = -offset.y;
|
|||
|
|
texcoord -= parallaxScale * offset;
|
|||
|
|
```
|
|||
|
|
|
|||
|
|
|
|||
|
|
2. Physically based refraction
|
|||
|
|
```c++
|
|||
|
|
// 角膜区域突起的模型
|
|||
|
|
// Alternatively, use a displacement map
|
|||
|
|
// height = max(-positionL.z – eyeIrisDepth, 0.0);
|
|||
|
|
|
|||
|
|
// 球形模型
|
|||
|
|
// Plot[Max[1.0 - 18.4 * r * r, 0.0], {r, 0, 0.3}]
|
|||
|
|
height = anteriorChamberDepth * saturate( 1.0 - 18.4 * radius * radius );
|
|||
|
|
|
|||
|
|
// refractedW
|
|||
|
|
float w = n * dot( normalW, viewW );
|
|||
|
|
float k = sqrt( 1.0 + ( w - n ) * ( w + n ) );
|
|||
|
|
float3 refractedW = ( w - k ) * normalW - n * viewW;
|
|||
|
|
|
|||
|
|
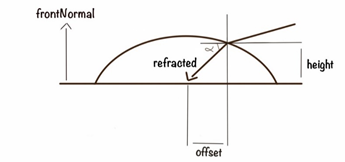
float cosAlpha = dot(frontNormalW, -refractedW);
|
|||
|
|
float dist = height / cosAlpha;
|
|||
|
|
float3 offsetW = dist * refractedW;
|
|||
|
|
float2 offsetL = mul(offsetW, (float3x2) worldInverse);
|
|||
|
|
texcoord += float2(mask, -mask) * offsetL;
|
|||
|
|
```
|
|||
|
|
|
|||
|
|
|
|||
|
|
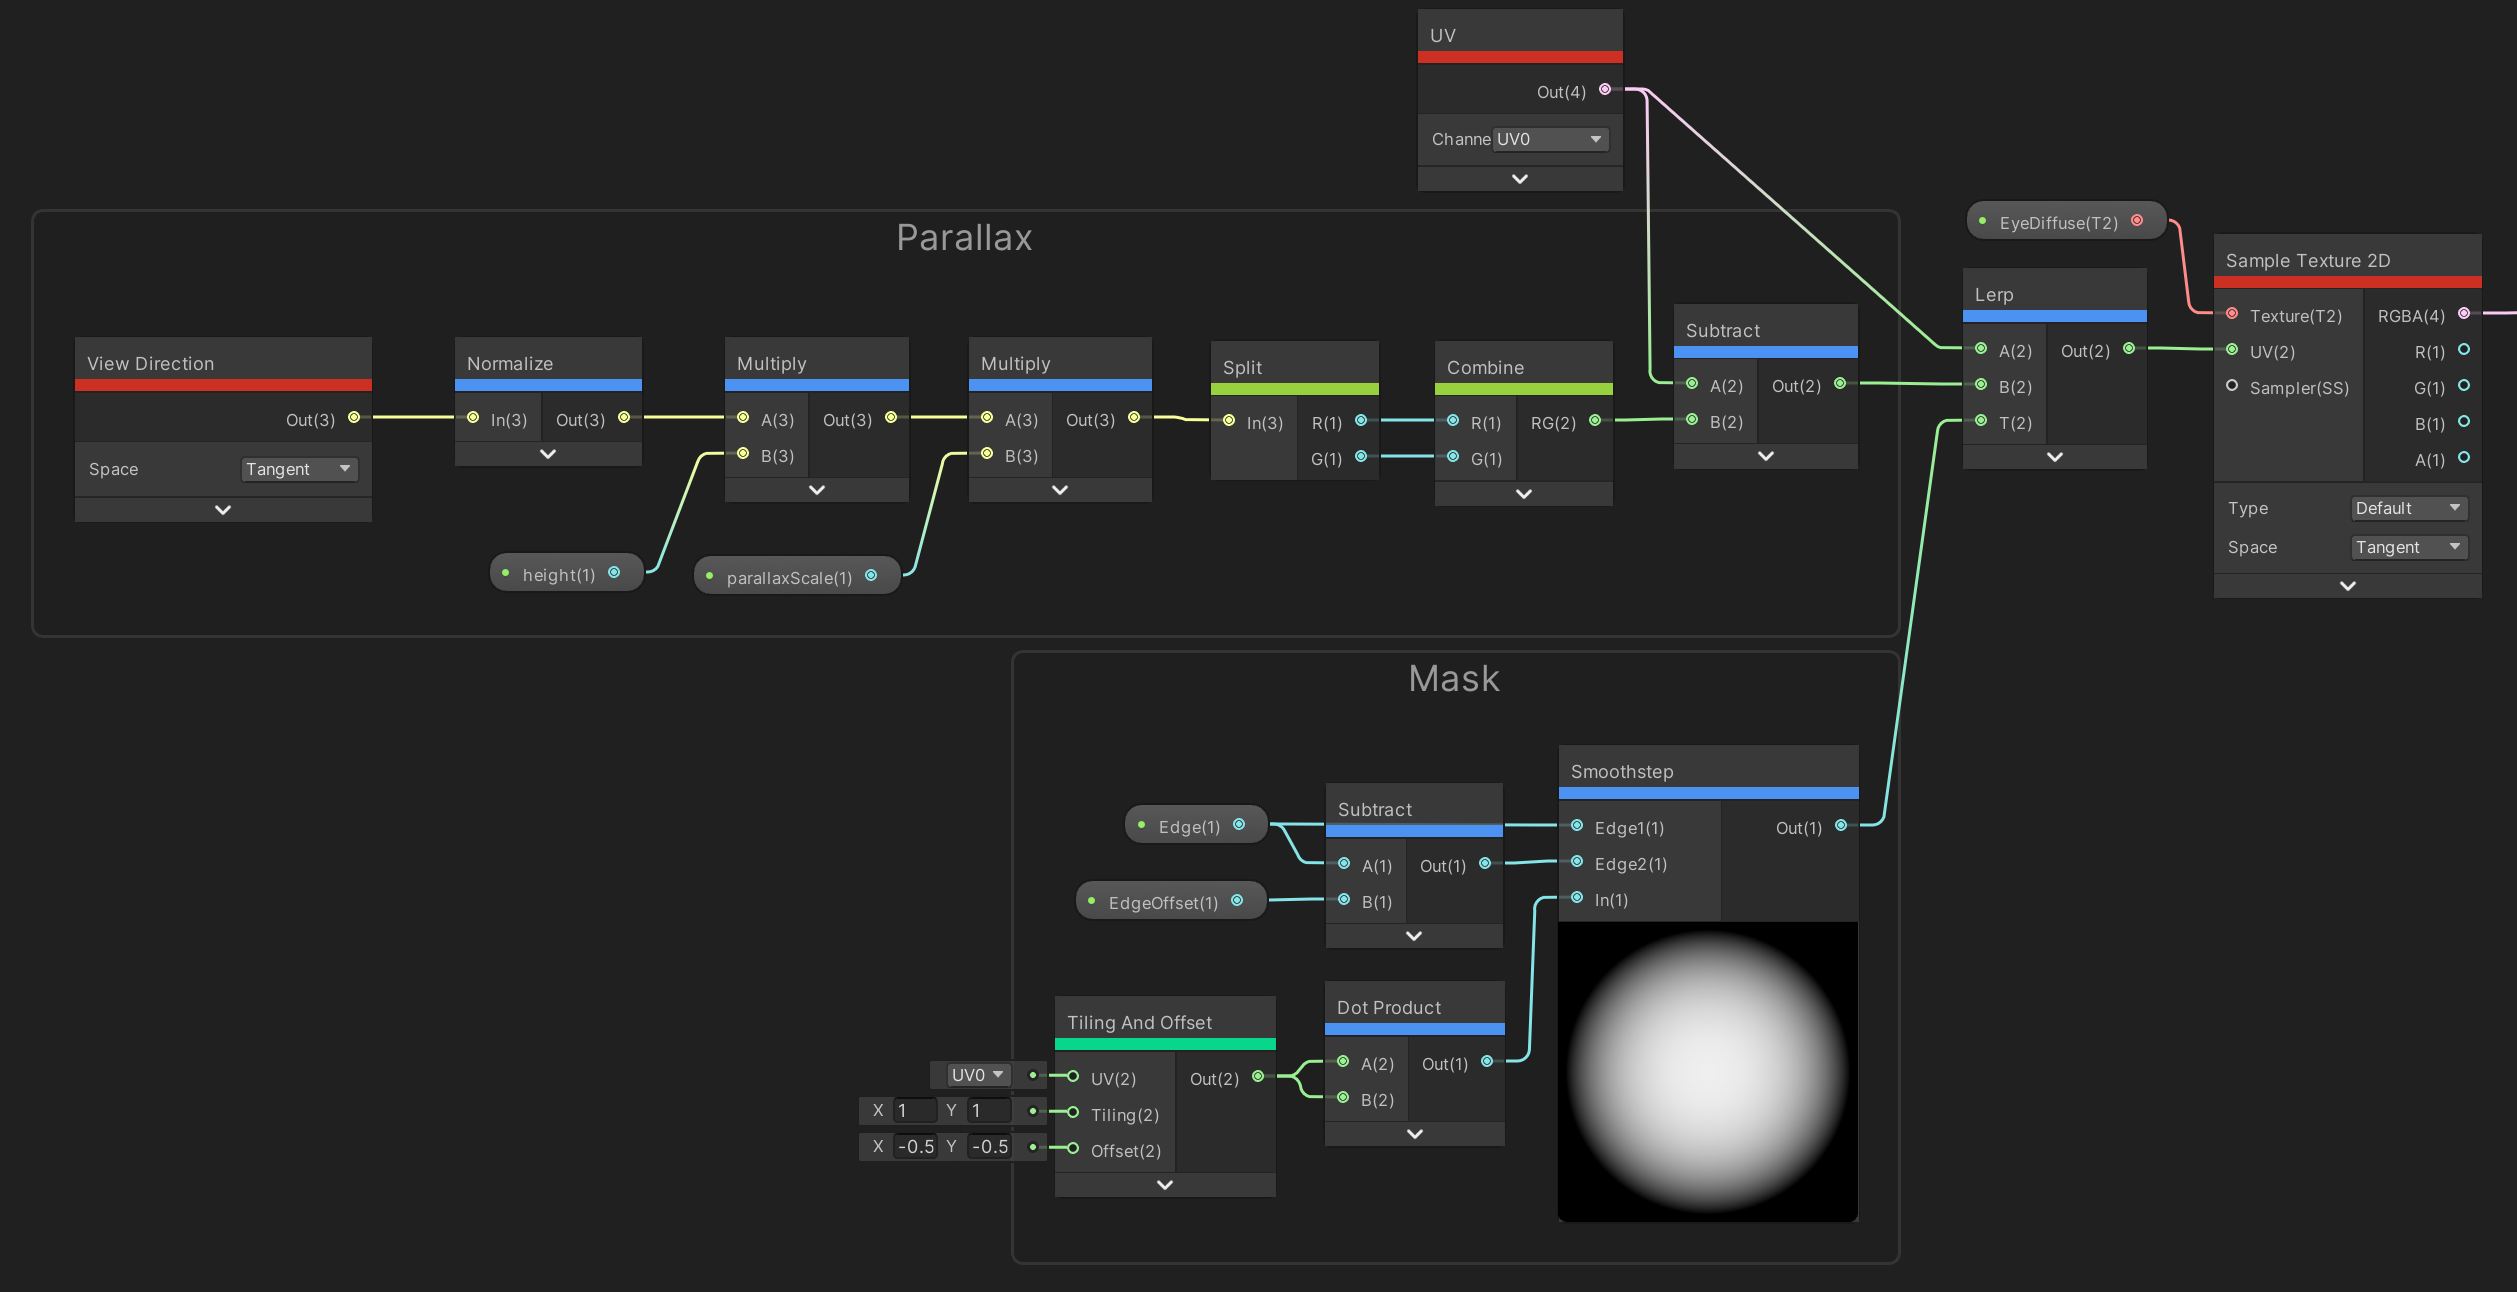
代码中首先计算了height,即前房的高度,PPT中height有两种计算方式,分别对应两种眼睛的模型结构,对应的结构写在注释中了。
|
|||
|
|
然后计算了refracted,这个是rtr中快速拟合的计算方法,n是空气与介质折射率的比值,关于refracted的推论可以参考:
|
|||
|
|
YivanLee:虚幻4渲染编程(人物篇)【第三卷:Human Eye Rendering】
|
|||
|
|
[129 赞同 · 12 评论文章](https://zhuanlan.zhihu.com/p/151786832)
|
|||
|
|
|
|||
|
|
最后一段,先通过frontNormalW与refractedW的点积计算出α角的cos值(上图中的α应该是标识错误,α是-refractedW与frontNormalW的夹角)。然后已知height,通过比值可以计算出refractedW的模长dist。offsetW即为完整的refractedW向量。最后转换到本地空间,乘上眼睛的Mask,加到原本的UV上。
|
|||
|
|
之后就是使用偏转后的UV去采样贴图了。
|
|||
|
|
与视差相同,这里也是在本地与世界空间中进行的计算,同样会有轴向问题,主要是normalW、viewW和frontNormalW参与的计算,normal与view可以转换到切线空间计算,而frontNormalW代表的是模型向前的朝向,这个必须要指定,不过图方便的话,把frontNormalW改成切线空间法线也不是不可以。
|
|||
|
|
|
|||
|
|
### 多层复合模型
|
|||
|
|
樱花大战cedec2020分享:https://blog.ch-wind.com/cedec2020-new-sakura-wars-note/
|
|||
|
|
|
|||
|
|
>本作的眼睛分为三个部分,眼白的部分是一个内凹的形状,瞳孔的部分则分为了向内凹的部分和向外突出的部分。
|
|||
|
|

|
|||
|
|
|
|||
|
|
>瞳孔的高光叠加在其突出的半透明部分上。根据摄像角度的不同,各个部分的贴图会分开进行移动,使得在哪个角度高光都能处在一个刚好的位置。
|
|||
|
|
控制上,有针对高光上下左右的移动强度与控制移动范围的参数共同作用。
|
|||
|
|
|
|||
|
|

|
|||
|
|
>从左边开始,是作为基础颜色的Albedo,以及用于Mask瞳孔的Alpha贴图,用于在Albedo上进行叠加的spt贴图,以及两张瞳孔高光,以及反应环境的matcapture贴图。
|
|||
|
|
虽然很多动画风格的渲染中会省略掉瞳孔中的虹彩部分,但是本作为了提高角色靠近时的效果,进行了详细的绘制,同时为了体现环境的变化与matcap的贴图进行叠加。
|
|||
|
|
高光贴图有两张,分别使用不同的UV动画进行控制,用于表现眼睛的湿润感。虽然是很细微的操作,但是对于表现角色的感情非常的有用。
|
|||
|
|
|
|||
|
|

|
|||
|
|
SunnySideUp UnityChan
|
|||
|
|
|
|||
|
|
### 其他效果实现
|
|||
|
|
#### 眼睛高光效果
|
|||
|
|
1. 贴图高光。使用事先绘制的高光形状贴图,贴到最外面的。并且使用ViewDirection来控制。设定4个UV Coord, 根据 View=》眼睛的本地坐标系=》Normalize后的向量进行插值。
|
|||
|
|
2. ~~PBR的思路~~
|
|||
|
|
|
|||
|
|
#### Matcap反射效果
|
|||
|
|
Matcap材质+球形法线贴图
|
|||
|
|
```c++
|
|||
|
|
float3 NormalBlend_MatcapUV_Detail = viewNormal.rgb * float3(-1,-1,1);
|
|||
|
|
float3 NormalBlend_MatcapUV_Base = (mul( UNITY_MATRIX_V, float4(viewDirection,0)).rgb*float3(-1,-1,1)) + float3(0,0,1);
|
|||
|
|
float3 noSknewViewNormal = NormalBlend_MatcapUV_Base * dot(NormalBlend_MatcapUV_Base, NormalBlend_MatcapUV_Detail) / NormalBlend_MatcapUV_Base.b - NormalBlend_MatcapUV_Detail;
|
|||
|
|
float2 ViewNormalAsMatCapUV = noSknewViewNormal.rg * 0.5 + 0.5;
|
|||
|
|
```
|
|||
|
|
|
|||
|
|
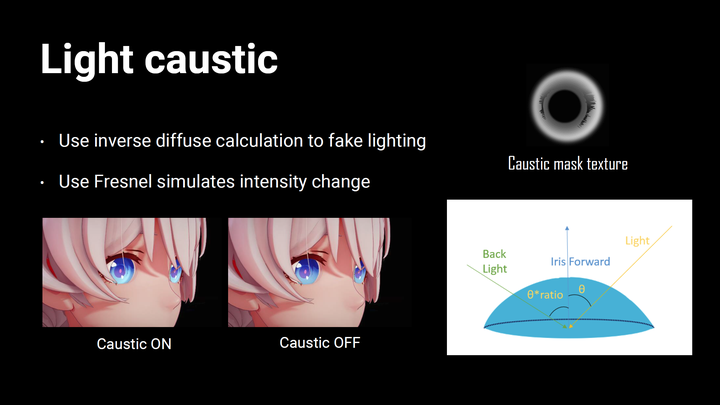
#### 焦散效果
|
|||
|
|
>焦散的表现反倒简单了,直接画在眼睛贴图上都可以,考虑到卡通表达的自由性,焦散是否存在与焦散的形状都可以没有限制,只要好看就行。
|
|||
|
|
下图也是miHoYo的分享,可以简单的理解为直接贴张Mask上去,然后用光照方向和菲涅尔去影响强度变化。
|
|||
|
|
|
|||
|
|
|
|||
|
|
使用Mask贴图、NoL与菲尼尔来控制
|
|||
|
|
|
|||
|
|
# 其他游戏方案
|
|||
|
|
* [蓝色协议](/document/UrealEngineNPR渲染实现/蓝色协议的方案.html)
|
|||
|
|
|
|||
|
|
# 大致方案
|
|||
|
|
- 主要分为在材质编辑器中完成大部分渲染
|
|||
|
|
- 传递少量参数到Lighting阶段并进行光照计算
|
|||
|
|
- 以上两者结合
|
|||
|
|
|
|||
|
|
## 待实现功能
|
|||
|
|
- [ ] 顶点色控制Outline宽度,使用顶点色G。
|
|||
|
|
- [ ] 使用[罪恶装备中的lightmap](#lightmap) 控制高光的区域和阈值,包括顶点色可以精准控制高光的强度。
|
|||
|
|
|
|||
|
|
## 具体实现
|
|||
|
|
### 全局设置实现
|
|||
|
|
AWorldSettings存储于ULevel中。可以通过Project Settings->Engine->General Settings->Default Classes来修改成其他的类作为默认类。
|
|||
|
|
```c#
|
|||
|
|
[/Script/Engine.Engine]
|
|||
|
|
WorldSettingsClassName=/Script/MySpiffyGame.MySpiffyGameWorldSettings
|
|||
|
|
```
|
|||
|
|
C++中修改Settings类:`void ULevel::SetWorldSettings(AWorldSettings* NewWorldSettings)`或许可以考虑子系统。
|
|||
|
|
|
|||
|
|
### Shader与管线变量添加
|
|||
|
|
```c#
|
|||
|
|
shadowAttenuation = mainLight.shadowAttenuation;
|
|||
|
|
|
|||
|
|
float _SystemShadowsLevel_var = (shadowAttenuation*0.5)+0.5+_Tweak_SystemShadowsLevel > 0.001 ? (shadowAttenuation*0.5)+0.5+_Tweak_SystemShadowsLevel : 0.0001;
|
|||
|
|
float Set_FinalShadowMask = saturate((1.0 + ( (lerp( _HalfLambert_var, _HalfLambert_var*saturate(_SystemShadowsLevel_var), _Set_SystemShadowsToBase ) - (_BaseColor_Step-_BaseShade_Feather)) * ((1.0 - _Set_1st_ShadePosition_var.rgb).r - 1.0) ) / (_BaseColor_Step - (_BaseColor_Step-_BaseShade_Feather))));
|
|||
|
|
```
|
|||
|
|
|
|||
|
|
Ramp相关变量
|
|||
|
|
- shadowAttenuation 默认为1(方向光没有这个参数)与 Tweak_SystemShadowsLevel,先暂时合并为HalfLambertFix
|
|||
|
|
- Step
|
|||
|
|
- Feather
|
|||
|
|
|
|||
|
|
|
|||
|
|
Shader开关变量
|
|||
|
|
- Is_LightColor_BaseColor:BaseColor是否受到LightColor影响
|
|||
|
|
- Is_LightColor_ShadeColor:1st_ShadeColor是否受到LightColor影响
|
|||
|
|
|
|||
|
|
FViewUniformShaderParameter添加数据
|
|||
|
|
-
|
|||
|
|
### 顶点色
|
|||
|
|
用于存储一些低精度数据,插值即可
|
|||
|
|
- R:
|
|||
|
|
- G:描边宽度
|
|||
|
|
- B:
|
|||
|
|
|
|||
|
|
蓝色协议的R:阴影区域标记 与 B:Ao,而罪恶装备使用贴图来传递信息。
|
|||
|
|
|
|||
|
|
### lightmap
|
|||
|
|
,G为阴影控(AO),R为高光强度参数,金属和光滑材质的部分设置的更大一些。B通道:用于照明控制。最大值为高光,反之,值越小高光越淡。
|
|||
|
|
|
|||
|
|
|
|||
|
|
https://zhuanlan.zhihu.com/p/360229590一文中介绍了崩坏3与原神的计算方式
|
|||
|
|
|
|||
|
|
崩坏3的LightMap计算方式:
|
|||
|
|
```c++
|
|||
|
|
half4 baseColor = SAMPLE_TEXTURE2D(_BaseMap, sampler_BaseMap, input.uv.xy);
|
|||
|
|
half4 LightMapColor = SAMPLE_TEXTURE2D(_LightMap, sampler_LightMap, input.uv.xy);
|
|||
|
|
half3 ShadowColor = baseColor.rgb * _ShadowMultColor.rgb;
|
|||
|
|
half3 DarkShadowColor = baseColor.rgb * _DarkShadowMultColor.rgb;
|
|||
|
|
|
|||
|
|
//如果SFactor = 0,ShallowShadowColor为一级阴影色,否则为BaseColor。
|
|||
|
|
float SWeight = (LightMapColor.g * input.color.r + input.lambert) * 0.5 + 1.125;
|
|||
|
|
float SFactor = floor(SWeight - _ShadowArea);
|
|||
|
|
half3 ShallowShadowColor = SFactor * baseColor.rgb + (1 - SFactor) * ShadowColor.rgb;
|
|||
|
|
```
|
|||
|
|
|
|||
|
|
二级阴影计算:
|
|||
|
|
```c++
|
|||
|
|
//如果SFactor = 0,DarkShadowColor为二级阴影色,否则为一级阴影色。
|
|||
|
|
SFactor = floor(SWeight - _DarkShadowArea);
|
|||
|
|
DarkShadowColor = SFactor * (_FixDarkShadow * ShadowColor + (1 - _FixDarkShadow) * ShallowShadowColor) + (1 - SFactor) * DarkShadowColor;
|
|||
|
|
|
|||
|
|
// 平滑阴影边缘
|
|||
|
|
half rampS = smoothstep(0, _ShadowSmooth, input.lambert - _ShadowArea);
|
|||
|
|
half rampDS = smoothstep(0, _DarkShadowSmooth, input.lambert - _DarkShadowArea);
|
|||
|
|
ShallowShadowColor.rgb = lerp(ShadowColor, baseColor.rgb, rampS);
|
|||
|
|
DarkShadowColor.rgb = lerp(DarkShadowColor.rgb, ShadowColor, rampDS);
|
|||
|
|
|
|||
|
|
//如果SFactor = 0,FinalColor为二级阴影,否则为一级阴影。
|
|||
|
|
SFactor = floor(LightMapColor.g * input.color.r + 0.9f);
|
|||
|
|
half4 FinalColor;
|
|||
|
|
FinalColor.rgb = SFactor * ShallowShadowColor + (1 - SFactor) * DarkShadowColor;
|
|||
|
|
```
|
|||
|
|
|
|||
|
|
|
|||
|
|
**罪恶装备**:
|
|||
|
|
对阴影判断阈值的偏移。(见前面着色部分,顶点AO+手绘修正)
|
|||
|
|
G : 轮廓线根据与相机的距离扩大多少的系数
|
|||
|
|
B : 等高线 Z 轴偏移值
|
|||
|
|
A : 轮廓厚度系数。0.5为标准,1为最大厚度,0为无等高线
|
|||
|
|
|
|||
|
|
### 描边
|
|||
|
|
**蓝色协议**:
|
|||
|
|
1. 使用Sobel过滤器进行深度检测描边。
|
|||
|
|
2. 使用Sobel过滤器进行Id图检测描边。
|
|||
|
|
3. 使用Sobel过滤器进行Normal检测描边。用于处理一些难以分ID,深度差又很小的地方,通过获取周围点法线求点乘的方式判断出轮廓。![[08-Assets/Images/ImageBag/UrealEngineNPR/蓝色协议_Normal检测描边.png)
|
|||
|
|
4. 预先画好的轮廓(GBuffer)。
|
|||
|
|
|
|||
|
|
所以使用需要 OutlineId、OutlineWidth(感觉可以传递一个全局Outline信息贴图再通过ID查表来获取,但只能在角色较少时使用)、OutlinePaint 、OutlineZShift(个人感觉不需要)
|
|||
|
|
|
|||
|
|
### 边缘光
|
|||
|
|
|
|||
|
|
### RimLighting
|
|||
|
|
|
|||
|
|
### 接触阴影
|
|||
|
|
|
|||
|
|
### 面部阴影
|
|||
|
|
使用Face ShaderModel,修改法线。描边使用ObjectPivot 缩放进行扩边。
|
|||
|
|
|
|||
|
|
### 后处理
|
|||
|
|
FSceneView存储FFinalPostProcessSettings FinalPostProcessSettings,场景的后处理信息。
|
|||
|
|
FBloomOutputs AddBloomPass(FRDGBuilder& GraphBuilder, const FViewInfo& View, const FBloomInputs& Inputs)
|
|||
|
|
|
|||
|
|
# GBuffer
|
|||
|
|
```c#
|
|||
|
|
OutGBufferA = WorldNormal/PerObjectGBufferData
|
|||
|
|
OutGBufferB = Metallic/Specular/Roughness/EncodeShadingModelIdAndSelectiveOutputMask(GBuffer.ShadingModelID, GBuffer.SelectiveOutputMask);
|
|||
|
|
OutGBufferC = BaseColor/GBufferAO
|
|||
|
|
OutGBufferD = GBuffer.CustomData;
|
|||
|
|
OutGBufferE = GBuffer.PrecomputedShadowFactors;
|
|||
|
|
```
|
|||
|
|
```c#
|
|||
|
|
GBufferB:Metallic/Specular/Roughness=>ToonHairMask OffsetShadowMask/SpcularMask/SpecularValue
|
|||
|
|
OutGBufferD = CustomData.xyzw=》ShaderColor.rgb/NoL
|
|||
|
|
OutGBufferE = GBuffer.PrecomputedShadowFactors.xyzw=》 /RimLightMask/DiffuseOffset/RimLightWidth
|
|||
|
|
OutGBufferF = velocity => OutlineWidth/OutlineID/OutlinePaint/OutlineZShift
|
|||
|
|
```
|
|||
|
|
|
|||
|
|
```
|
|||
|
|
| GBuffer | 表头 |
|
|||
|
|
| -------- | ------------------------------------------------------------------------------------- |
|
|||
|
|
| GBufferB | OffsetShadowMask SpcularMask SpecularValue EncodeShadingModelIdAndSelectiveOutputMask |
|
|||
|
|
| GBufferD | ShaderColor.rgb NoL |
|
|||
|
|
| GBufferE | |
|
|||
|
|
| GBufferF | ID |
|
|||
|
|
```
|
|||
|
|
|
|||
|
|
## BaseColor与ShadowColor
|
|||
|
|
- 原神里ShadowColor还会接收其他物体的阴影投射,没有自投影;蓝色协议可能也没有自投影。
|
|||
|
|
|
|||
|
|
BaseColor与ShadowColor的过渡需要Step、Feather、Offset等参数,可以直接制作一个HalfLambert的渐变贴图之后使用View传递。因为有多个贴图所以还需要ID贴图指定。但这样需要考虑一个问题:
|
|||
|
|
|
|||
|
|
- 一个物体上的同一个ID区域的BaseColor与ShadowColor是否都是一样的
|
|||
|
|
- 如果不一样就需要再传递一个ShadowColor.rgb到GBuffer里。
|
|||
|
|
- 不管如何手绘的补充暗部也是需要加到GBuffer中的
|
|||
|
|
|
|||
|
|
这决定传递到View里面的渐变贴图是彩色还是暗色
|
|||
|
|
|
|||
|
|
### 预计算贴图方案(构想)
|
|||
|
|
Toon渲染一般会使用HalfLambda。之后使用Feather、Step等参数对过渡边界进行调整
|
|||
|
|
使用 渐变贴图查表来实现 渐变、二阶化。以此代替羽化、step等参数。
|
|||
|
|
使用ID贴图指定,或者通过BaseColor值来查询?
|
|||
|
|
|
|||
|
|
## 高光
|
|||
|
|
- PBR高光(使用Roughness控制是否可行?是否需要传入GBuffer一个Mask贴图)
|
|||
|
|
- 自定义高光:高光贴图、高光颜色、参数化高光形状、多层高光
|
|||
|
|
|
|||
|
|
## 描边
|
|||
|
|
- 原神的描边好像是后处理
|
|||
|
|
- 蓝色协议
|
|||
|
|
![[08-Assets/Images/ImageBag/UrealEngineNPR/原神_描边.png]]
|
|||
|
|
![[08-Assets/Images/ImageBag/UrealEngineNPR/原神截图_描边.png]]
|
|||
|
|
|
|||
|
|
TODO:考虑使用顶点色来控制宽度,使用顶点色G
|
|||
|
|
|
|||
|
|
## 多光源
|
|||
|
|
主方向光:提供照明与Shadow,其他光只提供照亮效果。
|
|||
|
|
|
|||
|
|
![[08-Assets/Images/ImageBag/UrealEngineNPR/原神截图_光照.png]]
|
|||
|
|
|
|||
|
|
## 有关眉毛、表情需要使用 模板功能
|
|||
|
|
UTS使用模板
|
|||
|
|
![[08-Assets/Images/ImageBag/UrealEngineNPR/UTS表情.png]]
|
|||
|
|
![[08-Assets/Images/ImageBag/UrealEngineNPR/UTS表情_StencilOut.png]]
|
|||
|
|
![[08-Assets/Images/ImageBag/UrealEngineNPR/UTS表情_StencilMask.png]]
|
|||
|
|
|
|||
|
|
```
|
|||
|
|
Stencil
|
|||
|
|
{
|
|||
|
|
Ref[_StencilNo] //设置渲染的模板缓存值,0~255
|
|||
|
|
Comp[_StencilComp] //模板测试的通过条件,有除了equal,还有Greater、Less、Always、Never等,类似ZTest。
|
|||
|
|
Pass[_StencilOpPass] //表示通过模板测试和Z测试(注意是都通过)的像素,怎么处置它的模板值。
|
|||
|
|
Fail[_StencilOpFail] //表示通过了模板测试但没通过Z测试的像素,怎么处置它的模板值。
|
|||
|
|
}
|
|||
|
|
|
|||
|
|
_UTS_StencilMode mode = (_UTS_StencilMode)(material.GetInt(ShaderPropStencilMode));
|
|||
|
|
switch (mode)
|
|||
|
|
{
|
|||
|
|
case _UTS_StencilMode.Off:
|
|||
|
|
// material.SetInt(ShaderPropStencilNo,0);
|
|||
|
|
material.SetInt(ShaderPropStencilComp, (int)_StencilCompFunction.Disabled);
|
|||
|
|
material.SetInt(ShaderPropStencilOpPass, (int)_StencilOperation.Keep);
|
|||
|
|
material.SetInt(ShaderPropStencilOpFail, (int)_StencilOperation.Keep);
|
|||
|
|
break;
|
|||
|
|
case _UTS_StencilMode.StencilMask:
|
|||
|
|
// material.SetInt(ShaderPropStencilNo,0);
|
|||
|
|
material.SetInt(ShaderPropStencilComp, (int)_StencilCompFunction.Always);
|
|||
|
|
material.SetInt(ShaderPropStencilOpPass, (int)_StencilOperation.Replace);
|
|||
|
|
material.SetInt(ShaderPropStencilOpFail, (int)_StencilOperation.Replace);
|
|||
|
|
break;
|
|||
|
|
case _UTS_StencilMode.StencilOut:
|
|||
|
|
// material.SetInt(ShaderPropStencilNo,0);
|
|||
|
|
material.SetInt(ShaderPropStencilComp, (int)_StencilCompFunction.NotEqual);
|
|||
|
|
material.SetInt(ShaderPropStencilOpPass, (int)_StencilOperation.Keep);
|
|||
|
|
material.SetInt(ShaderPropStencilOpFail, (int)_StencilOperation.Keep);
|
|||
|
|
|
|||
|
|
break;
|
|||
|
|
}
|
|||
|
|
```
|
|||
|
|
|
|||
|
|
七大罪中使用使用了深度测试 Greater Equal.(默认是 less Equal)。但这个方式可能在UE4里不太行,因为UE4的深度测试是全局的?
|
|||
|
|
|
|||
|
|
这个应该需要创建一个MeshProcessor来实现:
|
|||
|
|
```c#
|
|||
|
|
FSingleLayerWaterPassMeshProcessor::FSingleLayerWaterPassMeshProcessor(const FScene* Scene, const FSceneView* InViewIfDynamicMeshCommand, const FMeshPassProcessorRenderState& InPassDrawRenderState, FMeshPassDrawListContext* InDrawListContext)
|
|||
|
|
: FMeshPassProcessor(Scene, Scene->GetFeatureLevel(), InViewIfDynamicMeshCommand, InDrawListContext)
|
|||
|
|
, PassDrawRenderState(InPassDrawRenderState)
|
|||
|
|
{
|
|||
|
|
if (SingleLayerWaterUsesSimpleShading(Scene->GetShaderPlatform()))
|
|||
|
|
{
|
|||
|
|
// Force non opaque, pre multiplied alpha, transparent blend mode because water is going to be blended against scene color (no distortion from texture scene color).
|
|||
|
|
FRHIBlendState* ForwardSimpleWaterBlendState = TStaticBlendState<CW_RGBA, BO_Add, BF_One, BF_InverseSourceAlpha>::GetRHI();
|
|||
|
|
PassDrawRenderState.SetBlendState(ForwardSimpleWaterBlendState);
|
|||
|
|
}
|
|||
|
|
}
|
|||
|
|
|
|||
|
|
//默认是CF_DepthNearOrEqual,做这个效果可能就要使用CF_DepthFartherOrEqual
|
|||
|
|
void SetupBasePassState(FExclusiveDepthStencil::Type BasePassDepthStencilAccess, const bool bShaderComplexity, FMeshPassProcessorRenderState& DrawRenderState)
|
|||
|
|
{
|
|||
|
|
DrawRenderState.SetDepthStencilAccess(BasePassDepthStencilAccess);
|
|||
|
|
if (bShaderComplexity)
|
|||
|
|
{
|
|||
|
|
// Additive blending when shader complexity viewmode is enabled.
|
|||
|
|
DrawRenderState.SetBlendState(TStaticBlendState<CW_RGBA, BO_Add, BF_One, BF_One, BO_Add, BF_Zero, BF_One>::GetRHI());
|
|||
|
|
// Disable depth writes as we have a full depth prepass.
|
|||
|
|
DrawRenderState.SetDepthStencilState(TStaticDepthStencilState<false, CF_DepthNearOrEqual>::GetRHI());
|
|||
|
|
}
|
|||
|
|
}
|
|||
|
|
```
|
|||
|
|
设置位置在于FXXXPassMeshProcessor::Process()中的SetDepthStencilStateForBasePass()中。需要bMaskedInEarlyPass为false,GetDepthStencilAccess为DepthRead。
|
|||
|
|
```c#
|
|||
|
|
const bool bMaskedInEarlyPass = (MaterialResource.IsMasked() || Mesh.bDitheredLODTransition) && MaskedInEarlyPass(GShaderPlatformForFeatureLevel[FeatureLevel]);
|
|||
|
|
|
|||
|
|
if (bEnableReceiveDecalOutput)
|
|||
|
|
{
|
|||
|
|
// Set stencil value for this draw call
|
|||
|
|
// This is effectively extending the GBuffer using the stencil bits
|
|||
|
|
const uint8 StencilValue = GET_STENCIL_BIT_MASK(RECEIVE_DECAL, PrimitiveSceneProxy ? !!PrimitiveSceneProxy->ReceivesDecals() : 0x00)
|
|||
|
|
| STENCIL_LIGHTING_CHANNELS_MASK(PrimitiveSceneProxy ? PrimitiveSceneProxy->GetLightingChannelStencilValue() : 0x00);
|
|||
|
|
|
|||
|
|
if (bMaskedInEarlyPass)
|
|||
|
|
{
|
|||
|
|
DrawRenderState.SetDepthStencilState(TStaticDepthStencilState<
|
|||
|
|
false, CF_Equal,
|
|||
|
|
true, CF_Always, SO_Keep, SO_Keep, SO_Replace,
|
|||
|
|
false, CF_Always, SO_Keep, SO_Keep, SO_Keep,
|
|||
|
|
0xFF, GET_STENCIL_BIT_MASK(RECEIVE_DECAL, 1) | STENCIL_LIGHTING_CHANNELS_MASK(0x7)
|
|||
|
|
>::GetRHI());
|
|||
|
|
DrawRenderState.SetStencilRef(StencilValue);
|
|||
|
|
}
|
|||
|
|
else if (DrawRenderState.GetDepthStencilAccess() & FExclusiveDepthStencil::DepthWrite)
|
|||
|
|
{
|
|||
|
|
DrawRenderState.SetDepthStencilState(TStaticDepthStencilState<
|
|||
|
|
true, CF_GreaterEqual,
|
|||
|
|
true, CF_Always, SO_Keep, SO_Keep, SO_Replace,
|
|||
|
|
false, CF_Always, SO_Keep, SO_Keep, SO_Keep,
|
|||
|
|
0xFF, GET_STENCIL_BIT_MASK(RECEIVE_DECAL, 1) | STENCIL_LIGHTING_CHANNELS_MASK(0x7)
|
|||
|
|
>::GetRHI());
|
|||
|
|
DrawRenderState.SetStencilRef(StencilValue);
|
|||
|
|
}
|
|||
|
|
else
|
|||
|
|
{
|
|||
|
|
DrawRenderState.SetDepthStencilState(TStaticDepthStencilState<
|
|||
|
|
false, CF_GreaterEqual,
|
|||
|
|
true, CF_Always, SO_Keep, SO_Keep, SO_Replace,
|
|||
|
|
false, CF_Always, SO_Keep, SO_Keep, SO_Keep,
|
|||
|
|
0xFF, GET_STENCIL_BIT_MASK(RECEIVE_DECAL, 1) | STENCIL_LIGHTING_CHANNELS_MASK(0x7)
|
|||
|
|
>::GetRHI());
|
|||
|
|
DrawRenderState.SetStencilRef(StencilValue);
|
|||
|
|
}
|
|||
|
|
}
|
|||
|
|
else if (bMaskedInEarlyPass)
|
|||
|
|
{
|
|||
|
|
DrawRenderState.SetDepthStencilState(TStaticDepthStencilState<false, CF_Equal>::GetRHI());
|
|||
|
|
}
|
|||
|
|
```
|
|||
|
|
|
|||
|
|
|
|||
|
|
# toonshading技术拆解
|
|||
|
|
{% simplemindmap %}
|
|||
|
|
```
|
|||
|
|
- toonshading技术拆解
|
|||
|
|
- 描边
|
|||
|
|
- 外描边:后处理描边 、 Mesh挤出 2种方式,原神采用了Mesh挤出。
|
|||
|
|
- 内描边:后处理、SDF描边、本村线 3种方式
|
|||
|
|
- 使用Mesh基础、后处理、模型绘制。(后处理传递Id贴图)
|
|||
|
|
- 分阶着色
|
|||
|
|
- 二阶化:
|
|||
|
|
- 多阶化:
|
|||
|
|
- 自定义次表面(暗部)颜色
|
|||
|
|
- 颜色过渡(羽化):
|
|||
|
|
- lut:待讨论
|
|||
|
|
- 高光
|
|||
|
|
- 高光贴图
|
|||
|
|
- 高光颜色
|
|||
|
|
- 参数化高光形状
|
|||
|
|
- 多层高光
|
|||
|
|
- 阴影
|
|||
|
|
- 自定义阴影颜色
|
|||
|
|
- 自定义阴影范围
|
|||
|
|
- 自定义阴影形状
|
|||
|
|
- 阴影过渡(sdf阴影)
|
|||
|
|
- 边缘光
|
|||
|
|
- 边缘光是否受到光照影响
|
|||
|
|
- 多层边缘光
|
|||
|
|
- 边缘光衰减(入射角度更明显 or 背光角度更明显)
|
|||
|
|
- 多光源支持
|
|||
|
|
- PBR支持
|
|||
|
|
- PBR和NPR混合
|
|||
|
|
- AO
|
|||
|
|
- matcap支持
|
|||
|
|
- 根据相机角度调整模型(非必要)
|
|||
|
|
- Shader内编辑法线
|
|||
|
|
- N=_scale * L + N
|
|||
|
|
- 眼睛
|
|||
|
|
- 反射 环境反射或者matcap支持
|
|||
|
|
- 内阴影 AO实现或者画死的内阴影
|
|||
|
|
- 瞳孔 瞳孔缩放
|
|||
|
|
- 视差和效果 凹凸效果
|
|||
|
|
- 高光 自定义高光形状&位置
|
|||
|
|
- 高光流动效果
|
|||
|
|
- 头发
|
|||
|
|
- 各项异性头发
|
|||
|
|
- 高光扰动
|
|||
|
|
- 高光贴图
|
|||
|
|
- 自定义高光属性
|
|||
|
|
- 高光天使环
|
|||
|
|
- 无各项异性头发
|
|||
|
|
- 自定义高光参数
|
|||
|
|
- 高光贴图
|
|||
|
|
- 高光天使环
|
|||
|
|
- 特殊效果
|
|||
|
|
- 眉毛/睫毛不受遮挡
|
|||
|
|
- 自发光
|
|||
|
|
- 阴影内素描效果
|
|||
|
|
- 额外效果
|
|||
|
|
- 后处理 辉光效果
|
|||
|
|
- 之后提到了SunFlare,应该是那个屏幕后处理效果。卡通渲染很依赖体积光,所以自然会有好的效果,假也没关系,假才是对的。谷歌搜SNN Filter https://www.shadertoy.com/view/MlyfWd
|
|||
|
|
- 旁边的Kuwahara应该是个类似的算法,64采样。
|
|||
|
|
```
|
|||
|
|
{% endsimplemindmap %}
|