## Emitter Properties-Deteminsim
勾选之后,重复播放的粒子都会是相同(随机值不会起作用)。可以用在制作阶段的效果预览,但需要在制作完后去掉勾选。
## 查看粒子各项数值与Debug技巧
在Niagara编辑器中的Window选项卡中开启Attribute Spreadsheet。即可对粒子数据进行捕获并查看。
你可以在给粒子设置Debug材质的方式来进行指定粒子的查看。具体的方式为:通过Niagara(Bindings)传递参数,之后材质中使用Debug节点进行显示。
### 按下键盘上的Pause键可以暂停
同时再按F8可以自由转换视角,或者在编辑器中点击Eject,结束对Character的控制,以此切换为自由观察视角来进行观察。
### 在play或者Simulate下按下;开启DebugCamera装下
在这个状态下有着各种调试功能。还可以检查场景剔除情况。
## Niagara系统的数据传递
https://zhuanlan.zhihu.com/p/74796515
1. 从外界把数据传进来
主要通过ParameterCollection或者直接对NiagaraSystem进行数据设置。(这个数据需要加到Niagara变量中的User标签下)
2. Emitter内部数据传递
本质上是使用MapGet和MapSet通过名字来找到数据的。
3. NiagaraModuleScript之间的数据传递
4. Emitter之间的数据传递
在ParticleUpdate里添加事件。(因为需要跟踪粒子Id,所以需要勾选RequiresPersistentIds)
在需要监听事件的Emitter中的EventHandler中添加监听事件即可。
## 调节场景中的Niagara粒子播放速度
命令行输入Slomo [倍率],即可调节播放速度,例如输入Slomo 0.1,就可以慢动作观察粒子播放了。
## 使用CurveAsset与CurveAtlasAsset将渐变信息导入材质中
CurveAtlas可以用于制作渐变贴图,它支持的渐变条数与TextureSize有关(一行一条渐变)。之后再材质编辑器是使用CurveAtlasRowParameter节点即可读取渐变信息。
给CurveTime输入节点连上上UV节点的R通道即可观察渐变效果。如果把黑白渐变图连上,那结果就会被染色成渐变效果。
CurveAtlas除了可以调整颜色值,还可以通过调整Alpha值曲线来调整边缘效果。
另一种思路就是使用材质编辑器中的Gradient系列节点。
## 让特效具有立体感
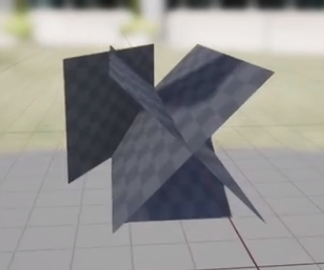
粒子模型使用穿插面片:

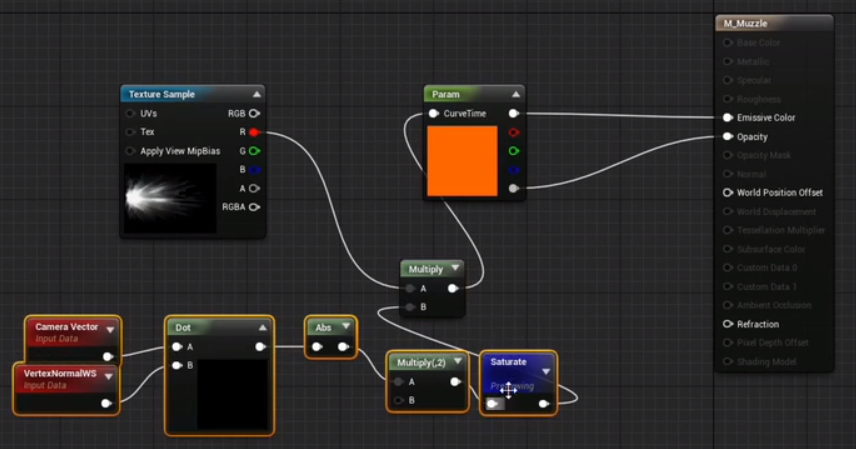
使用Fresnal或者DotProduct节点(记得使用abs),与黑白Ramp贴图相乘,以此来减弱接近平行的面片渲染效果。(记得勾选双面渲染)

## Ribbon与Beam
Beam也是使用Ribbon进行渲染的。差别在于,Ribbon是一个一个发射粒子,之后再渲染飘带模型。 Beam是一下就生成完所有粒子的,之后再渲染飘带模型。
### 设置步骤
1. 在EmitterUpdate中添加BeamEmitterUpdate
2. 在ParticleSpawn中添加SpawnBeam
3. 在Render中添加RibbonRenderer
记得勾选AbsoluteBeamEnd将本地坐标转化为世界坐标。
### 调整宽度
在ParticleSpawn中添加Initialize Ribbon
### 控制Ribbon UV
1. 在UV0Tiling Distance设置数值
2. 在材质编辑器中的对UV进行求余数运算。
个人认为或许使用WorldPosition应该可以把。
## 另一种给材质传递传递数据的方法
对一个StaticMesh调用SetCustom Primtive Data XXX。(可以是float、Vec2、vec3、vec4)之后在材质编辑器中新建一个变量节点,之后在变量节点的Details-CustomPrimitiveData选项卡中,勾选UseCustomPrimitveData。
它的消耗比Dynamic Material Instance少的多,而且不同的Component都是相互独立的,不像材质集是全局的。
## 性能调试
Shift+Ctrl+,开启GPU Visualizer
限制:其基类必须是Primtive。
## 直接控制SubImageIndex变量
通过修改SubImageIndex变量的方式来直接控制SubMaterial渲染结果。
### 使用随机值进行采样
可以在Niagara里设置一个变量,在使用SetParameter节点对这个变量赋予随机值,之后使用这个随机值变量对曲线进行采样。(将这个值赋予CurveIndex)
### 碰撞
碰撞类型需要与粒子类型相同(GPU与CPU)。同时使用的粒子材质需要是Translucent,使用Mask会影响场景深度,使得Depth不正确,从而导致模拟出问题。
下雨逻辑,GPU判定碰撞,产生事件,计算碰撞时间与法线,之后生成水花(SubImage)
If you open the Material function "Imposter_ThreeFrameBlend" you will have to go to each "World to Loc" node and edit the shader code by replacing Primitive by GetPrimitiveData(Parameters.PrimitiveId).
In the material editor go to Window and then "Find results"
There you can search for "Custom" this will look for every custom node with custom code. Cycle through every result until you find a World to Loc node.
Then you can proceed to edit the code. There are a total of 5 nodes which you need to edit.
The edited code for me looks like this :
```c++
#if USE_INSTANCING || IS_MESHPARTICLE_FACTORY
return mul(InWorldVector, transpose(Parameters.InstanceLocalToWorld));
#else
return mul(InWorldVector, (MaterialFloat3x3)GetPrimitiveData(Parameters.PrimitiveId).WorldToLocal);
#endif
```
And like this :
```c++
#if USE_INSTANCING || IS_MESHPARTICLE_FACTORY
float3 temp;
temp.x = length(TransformLocalVectorToWorld(Parameters, float3(1,0,0)));
temp.y = length(TransformLocalVectorToWorld(Parameters, float3(0,1,0)));
temp.z = length(TransformLocalVectorToWorld(Parameters, float3(0,0,1)));
return mul(InWorldVector, (MaterialFloat3x3)transpose(Parameters.InstanceLocalToWorld)) / (temp*temp);
#else
return mul(InWorldVector, (MaterialFloat3x3)GetPrimitiveData(Parameters.PrimitiveId).WorldToLocal);
#endif
```
---
- https://answers.unrealengine.com/questions/882887/index.html
- https://docs.unrealengine.com/en-US/Programming/Rendering/MeshDrawingPipeline/4_22_ConversionGuide/index.html
primitive replace by GetPrimitiveData(Parameters.PrimitiveId)
```c++
#if USE_INSTANCING || IS_MESHPARTICLE_FACTORY
return mul(InWorldVector, transpose(Parameters.InstanceLocalToWorld));
#else
return mul(InWorldVector, (MaterialFloat3x3)Primitive.WorldToLocal);
#endif
```