114 lines
6.3 KiB
Markdown
114 lines
6.3 KiB
Markdown
## Emitter Properties-Deteminsim
|
||
勾选之后,重复播放的粒子都会是相同(随机值不会起作用)。可以用在制作阶段的效果预览,但需要在制作完后去掉勾选。
|
||
|
||
## 查看粒子各项数值与Debug技巧
|
||
在Niagara编辑器中的Window选项卡中开启Attribute Spreadsheet。即可对粒子数据进行捕获并查看。
|
||
|
||
你可以在给粒子设置Debug材质的方式来进行指定粒子的查看。具体的方式为:通过Niagara(Bindings)传递参数,之后材质中使用Debug节点进行显示。
|
||
### 按下键盘上的Pause键可以暂停
|
||
同时再按F8可以自由转换视角,或者在编辑器中点击Eject,结束对Character的控制,以此切换为自由观察视角来进行观察。
|
||
### 在play或者Simulate下按下;开启DebugCamera装下
|
||
在这个状态下有着各种调试功能。还可以检查场景剔除情况。
|
||
|
||
## Niagara系统的数据传递
|
||
https://zhuanlan.zhihu.com/p/74796515
|
||
1. 从外界把数据传进来<br>
|
||
主要通过ParameterCollection或者直接对NiagaraSystem进行数据设置。(这个数据需要加到Niagara变量中的User标签下)
|
||
2. Emitter内部数据传递<br>
|
||
本质上是使用MapGet和MapSet通过名字来找到数据的。
|
||
3. NiagaraModuleScript之间的数据传递<br>
|
||
4. Emitter之间的数据传递<br>
|
||
在ParticleUpdate里添加事件。(因为需要跟踪粒子Id,所以需要勾选RequiresPersistentIds)<br>
|
||
在需要监听事件的Emitter中的EventHandler中添加监听事件即可。
|
||
|
||
## 调节场景中的Niagara粒子播放速度
|
||
命令行输入Slomo [倍率],即可调节播放速度,例如输入Slomo 0.1,就可以慢动作观察粒子播放了。
|
||
|
||
## 使用CurveAsset与CurveAtlasAsset将渐变信息导入材质中
|
||
CurveAtlas可以用于制作渐变贴图,它支持的渐变条数与TextureSize有关(一行一条渐变)。之后再材质编辑器是使用CurveAtlasRowParameter节点即可读取渐变信息。
|
||
|
||
给CurveTime输入节点连上上UV节点的R通道即可观察渐变效果。如果把黑白渐变图连上,那结果就会被染色成渐变效果。
|
||
|
||
CurveAtlas除了可以调整颜色值,还可以通过调整Alpha值曲线来调整边缘效果。
|
||
|
||
另一种思路就是使用材质编辑器中的Gradient系列节点。
|
||
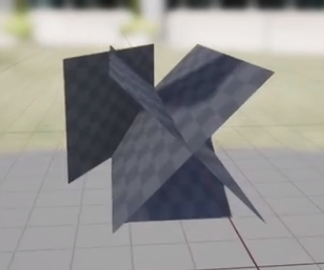
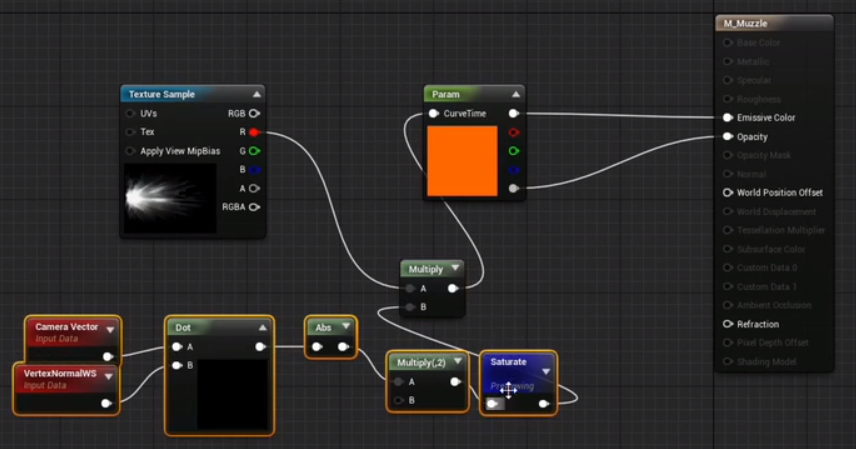
## 让特效具有立体感
|
||
粒子模型使用穿插面片:
|
||
|
||
|
||
使用Fresnal或者DotProduct节点(记得使用abs),与黑白Ramp贴图相乘,以此来减弱接近平行的面片渲染效果。(记得勾选双面渲染)
|
||
|
||
|
||
## Ribbon与Beam
|
||
Beam也是使用Ribbon进行渲染的。差别在于,Ribbon是一个一个发射粒子,之后再渲染飘带模型。 Beam是一下就生成完所有粒子的,之后再渲染飘带模型。
|
||
### 设置步骤
|
||
1. 在EmitterUpdate中添加BeamEmitterUpdate
|
||
2. 在ParticleSpawn中添加SpawnBeam
|
||
3. 在Render中添加RibbonRenderer
|
||
|
||
记得勾选AbsoluteBeamEnd将本地坐标转化为世界坐标。
|
||
### 调整宽度
|
||
在ParticleSpawn中添加Initialize Ribbon
|
||
### 控制Ribbon UV
|
||
1. 在UV0Tiling Distance设置数值
|
||
2. 在材质编辑器中的对UV进行求余数运算。
|
||
|
||
个人认为或许使用WorldPosition应该可以把。
|
||
|
||
## 另一种给材质传递传递数据的方法
|
||
对一个StaticMesh调用SetCustom Primtive Data XXX。(可以是float、Vec2、vec3、vec4)之后在材质编辑器中新建一个变量节点,之后在变量节点的Details-CustomPrimitiveData选项卡中,勾选UseCustomPrimitveData。
|
||
|
||
它的消耗比Dynamic Material Instance少的多,而且不同的Component都是相互独立的,不像材质集是全局的。
|
||
## 性能调试
|
||
Shift+Ctrl+,开启GPU Visualizer
|
||
|
||
限制:其基类必须是Primtive。
|
||
|
||
## 直接控制SubImageIndex变量
|
||
通过修改SubImageIndex变量的方式来直接控制SubMaterial渲染结果。
|
||
|
||
### 使用随机值进行采样
|
||
可以在Niagara里设置一个变量,在使用SetParameter节点对这个变量赋予随机值,之后使用这个随机值变量对曲线进行采样。(将这个值赋予CurveIndex)
|
||
|
||
### 碰撞
|
||
碰撞类型需要与粒子类型相同(GPU与CPU)。同时使用的粒子材质需要是Translucent,使用Mask会影响场景深度,使得Depth不正确,从而导致模拟出问题。
|
||
|
||
下雨逻辑,GPU判定碰撞,产生事件,计算碰撞时间与法线,之后生成水花(SubImage)
|
||
|
||
If you open the Material function "Imposter_ThreeFrameBlend" you will have to go to each "World to Loc" node and edit the shader code by replacing Primitive by GetPrimitiveData(Parameters.PrimitiveId).
|
||
|
||
In the material editor go to Window and then "Find results"
|
||
There you can search for "Custom" this will look for every custom node with custom code. Cycle through every result until you find a World to Loc node.
|
||
Then you can proceed to edit the code. There are a total of 5 nodes which you need to edit.
|
||
|
||
The edited code for me looks like this :
|
||
```c++
|
||
#if USE_INSTANCING || IS_MESHPARTICLE_FACTORY
|
||
return mul(InWorldVector, transpose(Parameters.InstanceLocalToWorld));
|
||
#else
|
||
return mul(InWorldVector, (MaterialFloat3x3)GetPrimitiveData(Parameters.PrimitiveId).WorldToLocal);
|
||
#endif
|
||
```
|
||
And like this :
|
||
```c++
|
||
#if USE_INSTANCING || IS_MESHPARTICLE_FACTORY
|
||
float3 temp;
|
||
temp.x = length(TransformLocalVectorToWorld(Parameters, float3(1,0,0)));
|
||
temp.y = length(TransformLocalVectorToWorld(Parameters, float3(0,1,0)));
|
||
temp.z = length(TransformLocalVectorToWorld(Parameters, float3(0,0,1)));
|
||
return mul(InWorldVector, (MaterialFloat3x3)transpose(Parameters.InstanceLocalToWorld)) / (temp*temp);
|
||
#else
|
||
return mul(InWorldVector, (MaterialFloat3x3)GetPrimitiveData(Parameters.PrimitiveId).WorldToLocal);
|
||
#endif
|
||
```
|
||
---
|
||
- https://answers.unrealengine.com/questions/882887/index.html
|
||
- https://docs.unrealengine.com/en-US/Programming/Rendering/MeshDrawingPipeline/4_22_ConversionGuide/index.html
|
||
primitive replace by GetPrimitiveData(Parameters.PrimitiveId)
|
||
```c++
|
||
#if USE_INSTANCING || IS_MESHPARTICLE_FACTORY
|
||
return mul(InWorldVector, transpose(Parameters.InstanceLocalToWorld));
|
||
#else
|
||
return mul(InWorldVector, (MaterialFloat3x3)Primitive.WorldToLocal);
|
||
#endif
|
||
``` |