184 lines
8.0 KiB
Markdown
184 lines
8.0 KiB
Markdown
---
|
||
title: ToonPostProcess
|
||
date: 2024-05-15 16:50:13
|
||
excerpt:
|
||
tags:
|
||
rating: ⭐
|
||
---
|
||
# FFT
|
||
|
||
# Bloom
|
||
Bloom主要分
|
||
- Bloom
|
||
- FFTBloom
|
||
- LensFlares
|
||
|
||
|
||
BloomThreshold,ClampMin = "-1.0", UIMax = "8.0"。
|
||
相关逻辑位于:
|
||
```c++
|
||
if (bBloomSetupRequiredEnabled)
|
||
{
|
||
const float BloomThreshold = View.FinalPostProcessSettings.BloomThreshold;
|
||
|
||
FBloomSetupInputs SetupPassInputs;
|
||
SetupPassInputs.SceneColor = DownsampleInput;
|
||
SetupPassInputs.EyeAdaptationBuffer = EyeAdaptationBuffer;
|
||
SetupPassInputs.EyeAdaptationParameters = &EyeAdaptationParameters;
|
||
SetupPassInputs.LocalExposureParameters = &LocalExposureParameters;
|
||
SetupPassInputs.LocalExposureTexture = CVarBloomApplyLocalExposure.GetValueOnRenderThread() ? LocalExposureTexture : nullptr;
|
||
SetupPassInputs.BlurredLogLuminanceTexture = LocalExposureBlurredLogLumTexture;
|
||
SetupPassInputs.Threshold = BloomThreshold;
|
||
SetupPassInputs.ToonThreshold = View.FinalPostProcessSettings.ToonBloomThreshold;
|
||
|
||
DownsampleInput = AddBloomSetupPass(GraphBuilder, View, SetupPassInputs);
|
||
}
|
||
```
|
||
## FFTBloom
|
||
***普通Bloom算法只能做到圆形光斑,对于自定义形状的就需要使用FFTBloom。***
|
||
|
||
- FFT Bloom:https://zhuanlan.zhihu.com/p/611582936
|
||
- Unity FFT Bloom:https://github.com/AKGWSB/FFTConvolutionBloom
|
||
|
||
### 频域与卷积定理
|
||
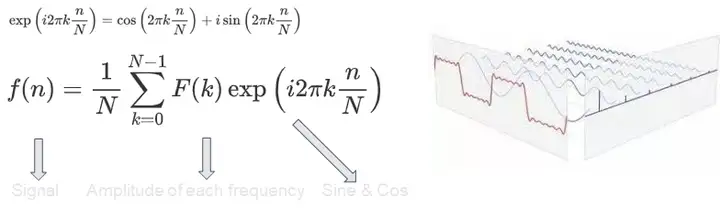
图像可以视为二维的信号,而一个信号可以通过 **不同频率** 的 Sine & Cosine 函数的线性叠加来近似得到。对于每个频率的函数,我们乘以一个常数振幅并叠加到最终的结果上,这些振幅叫做 **频谱**。值得注意的是所有的 F_k 都是 **复数**:
|
||
|
||
|
||
此时频域上的每个振幅不再代表某个单个的时域样本,而是代表该频段的 Sine & Cosine 函数对时域信号的 **整体** 贡献。频域信号包含了输入图像的全部时域信息,***因此卷积定理告诉我们在时域上对信号做卷积,等同于将源图像与滤波盒图像在频域上的频谱(上图系数 V_k)做简单复数 **乘法***:
|
||
|
||
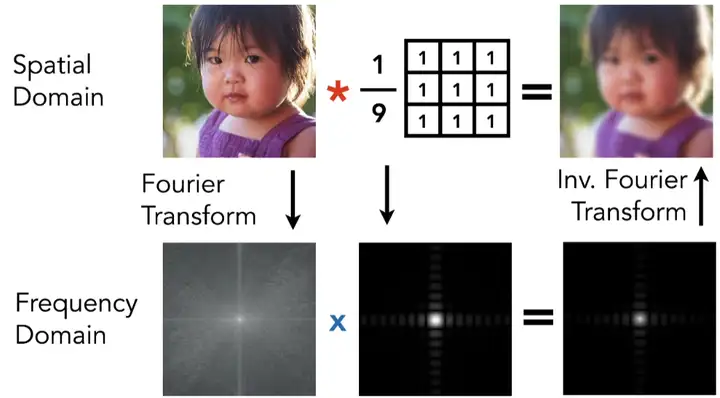
一一对位的乘法速度是远远快于需要循环累加的朴素卷积操作。因此接下来我们的目标就是找到一种方法,建立图像信号与其频域之间的联系。在通信领域通常使用傅里叶变换来进行信号的频、时域转换
|
||
|
||
### 相关代码
|
||
- c++
|
||
- AddFFTBloomPass()
|
||
- FBloomFinalizeApplyConstantsCS (Bloom计算完成)
|
||
- AddTonemapPass(),PassInputs.Bloom = Bloom与PassInputs.SceneColorApplyParamaters
|
||
- Shader
|
||
-
|
||
|
||
**FBloomFindKernelCenterCS**:用于找到Bloom效果的核(Kernel)中心(纹理中找到最亮的像素)。用于在一个,并记录其位置。主要通过计算Luminance来获取到中心区域,而在这里的中心区域可以有多个,这也代表着在最终输出的SceneColor里可以有多个【曝点光晕(Bloom)效果】
|
||
|
||
|
||
|
||
# 实用代码
|
||
代码位于DeferredShadingCommon.ush:
|
||
```c++
|
||
// @param UV - UV space in the GBuffer textures (BufferSize resolution)
|
||
FGBufferData GetGBufferData(float2 UV, bool bGetNormalizedNormal = true)
|
||
{
|
||
#if GBUFFER_REFACTOR
|
||
return DecodeGBufferDataUV(UV,bGetNormalizedNormal);
|
||
#else
|
||
float4 GBufferA = Texture2DSampleLevel(SceneTexturesStruct.GBufferATexture, SceneTexturesStruct_GBufferATextureSampler, UV, 0);
|
||
float4 GBufferB = Texture2DSampleLevel(SceneTexturesStruct.GBufferBTexture, SceneTexturesStruct_GBufferBTextureSampler, UV, 0);
|
||
float4 GBufferC = Texture2DSampleLevel(SceneTexturesStruct.GBufferCTexture, SceneTexturesStruct_GBufferCTextureSampler, UV, 0);
|
||
float4 GBufferD = Texture2DSampleLevel(SceneTexturesStruct.GBufferDTexture, SceneTexturesStruct_GBufferDTextureSampler, UV, 0);
|
||
float CustomNativeDepth = Texture2DSampleLevel(SceneTexturesStruct.CustomDepthTexture, SceneTexturesStruct_CustomDepthTextureSampler, UV, 0).r;
|
||
|
||
// BufferToSceneTextureScale is necessary when translucent materials are rendered in a render target
|
||
// that has a different resolution than the scene color textures, e.g. r.SeparateTranslucencyScreenPercentage < 100.
|
||
int2 IntUV = (int2)trunc(UV * View.BufferSizeAndInvSize.xy * View.BufferToSceneTextureScale.xy);
|
||
uint CustomStencil = SceneTexturesStruct.CustomStencilTexture.Load(int3(IntUV, 0)) STENCIL_COMPONENT_SWIZZLE;
|
||
|
||
#if ALLOW_STATIC_LIGHTING
|
||
float4 GBufferE = Texture2DSampleLevel(SceneTexturesStruct.GBufferETexture, SceneTexturesStruct_GBufferETextureSampler, UV, 0);
|
||
#else
|
||
float4 GBufferE = 1;
|
||
#endif
|
||
|
||
float4 GBufferF = Texture2DSampleLevel(SceneTexturesStruct.GBufferFTexture, SceneTexturesStruct_GBufferFTextureSampler, UV, 0);
|
||
|
||
#if WRITES_VELOCITY_TO_GBUFFER
|
||
float4 GBufferVelocity = Texture2DSampleLevel(SceneTexturesStruct.GBufferVelocityTexture, SceneTexturesStruct_GBufferVelocityTextureSampler, UV, 0);
|
||
#else
|
||
float4 GBufferVelocity = 0;
|
||
#endif
|
||
|
||
float SceneDepth = CalcSceneDepth(UV);
|
||
|
||
return DecodeGBufferData(GBufferA, GBufferB, GBufferC, GBufferD, GBufferE, GBufferF, GBufferVelocity, CustomNativeDepth, CustomStencil, SceneDepth, bGetNormalizedNormal, CheckerFromSceneColorUV(UV));
|
||
#endif
|
||
}
|
||
|
||
// Minimal path for just the lighting model, used to branch around unlit pixels (skybox)
|
||
uint GetShadingModelId(float2 UV)
|
||
{
|
||
return DecodeShadingModelId(Texture2DSampleLevel(SceneTexturesStruct.GBufferBTexture, SceneTexturesStruct_GBufferBTextureSampler, UV, 0).a);
|
||
}
|
||
```
|
||
|
||
## ShadingModel判断
|
||
```c++
|
||
bool IsToonShadingModel(float2 UV)
|
||
{
|
||
uint ShadingModel = DecodeShadingModelId(Texture2DSampleLevel(SceneTexturesStruct.GBufferBTexture, SceneTexturesStruct_GBufferBTextureSampler, UV, 0).a);
|
||
return ShadingModel == SHADINGMODELID_TOONSTANDARD
|
||
|| ShadingModel == SHADINGMODELID_PREINTEGRATED_SKIN;
|
||
}
|
||
```
|
||
PS.需要Shader添加FSceneTextureShaderParameters/FSceneTextureUniformParameters。
|
||
```c++
|
||
IMPLEMENT_STATIC_UNIFORM_BUFFER_STRUCT(FSceneTextureUniformParameters, "SceneTexturesStruct", SceneTextures);
|
||
|
||
BEGIN_SHADER_PARAMETER_STRUCT(FSceneTextureShaderParameters, ENGINE_API)
|
||
SHADER_PARAMETER_RDG_UNIFORM_BUFFER(FSceneTextureUniformParameters, SceneTextures)
|
||
SHADER_PARAMETER_RDG_UNIFORM_BUFFER(FMobileSceneTextureUniformParameters, MobileSceneTextures)
|
||
END_SHADER_PARAMETER_STRUCT()
|
||
```
|
||
|
||
|
||
|
||
# ToneMapping
|
||
- UE4/UE5和ACES工作流程:https://zhuanlan.zhihu.com/p/660965710
|
||
|
||
UE4版本的笔记:[[UE4 ToneMapping]]
|
||
|
||
TonemapCommon.ush中的FilmToneMap()在CombineLUTsCommon()中调用。其顺序为:
|
||
1. AddCombineLUTPass() => PostProcessCombineLUTs.usf
|
||
2. AddTonemapPass() => PostProcessTonemap.usf
|
||
|
||
```c++
|
||
void AddPostProcessingPasses()
|
||
{
|
||
...
|
||
{
|
||
FRDGTextureRef ColorGradingTexture = nullptr;
|
||
|
||
if (bPrimaryView)
|
||
{
|
||
ColorGradingTexture = AddCombineLUTPass(GraphBuilder, View);
|
||
}
|
||
// We can re-use the color grading texture from the primary view.
|
||
else if (View.GetTonemappingLUT())
|
||
{
|
||
ColorGradingTexture = TryRegisterExternalTexture(GraphBuilder, View.GetTonemappingLUT());
|
||
}
|
||
else
|
||
{
|
||
const FViewInfo* PrimaryView = static_cast<const FViewInfo*>(View.Family->Views[0]);
|
||
ColorGradingTexture = TryRegisterExternalTexture(GraphBuilder, PrimaryView->GetTonemappingLUT());
|
||
}
|
||
|
||
FTonemapInputs PassInputs;
|
||
PassSequence.AcceptOverrideIfLastPass(EPass::Tonemap, PassInputs.OverrideOutput);
|
||
PassInputs.SceneColor = SceneColorSlice;
|
||
PassInputs.Bloom = Bloom;
|
||
PassInputs.SceneColorApplyParamaters = SceneColorApplyParameters;
|
||
PassInputs.LocalExposureTexture = LocalExposureTexture;
|
||
PassInputs.BlurredLogLuminanceTexture = LocalExposureBlurredLogLumTexture;
|
||
PassInputs.LocalExposureParameters = &LocalExposureParameters;
|
||
PassInputs.EyeAdaptationParameters = &EyeAdaptationParameters;
|
||
PassInputs.EyeAdaptationBuffer = EyeAdaptationBuffer;
|
||
PassInputs.ColorGradingTexture = ColorGradingTexture;
|
||
PassInputs.bWriteAlphaChannel = AntiAliasingMethod == AAM_FXAA || bProcessSceneColorAlpha;
|
||
PassInputs.bOutputInHDR = bTonemapOutputInHDR;
|
||
|
||
SceneColor = AddTonemapPass(GraphBuilder, View, PassInputs);
|
||
}
|
||
...
|
||
}
|
||
```
|
||
|
||
## PostProcessCombineLUTs.usf
|
||
|
||
## PostProcessTonemap.usf |