前言
之前想使用UE4实现IOchair通过Blender晶格变形,实现的二次元角色面部透视矫正效果。在使用HLSL写了1/3晶格效果和IOchair沟通后,才发现这个功能只需要通过在摄像机坐标系下调整模型顶点的Z值即可。但要在Ue4的材质编辑器中实现这个功能就必须知道Ue4的VertexShader处理过程,于是我花了些时间研究了一下。
效果实现思路:
一句话解释就是在模型的顶点坐标转换到摄像机坐标后,在乘以投影矩阵前对其Z值进行调整,以实现纸片人的效果。
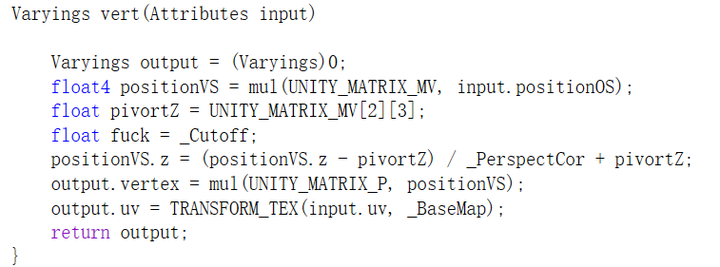
参考了以下这篇文章:
https://zhuanlan.zhihu.com/p/268433650?utm_source=ZHShareTargetIDMore
IOchair的补充
透视矫正的作用补充一下,还有:
- 减弱AO,空间扁了AO变浅,更二维
- 清理前发投影,刘海在额头上的投影变得整齐美观
- 顺滑高光,高光连续感更强
下图为IOchair的演示图: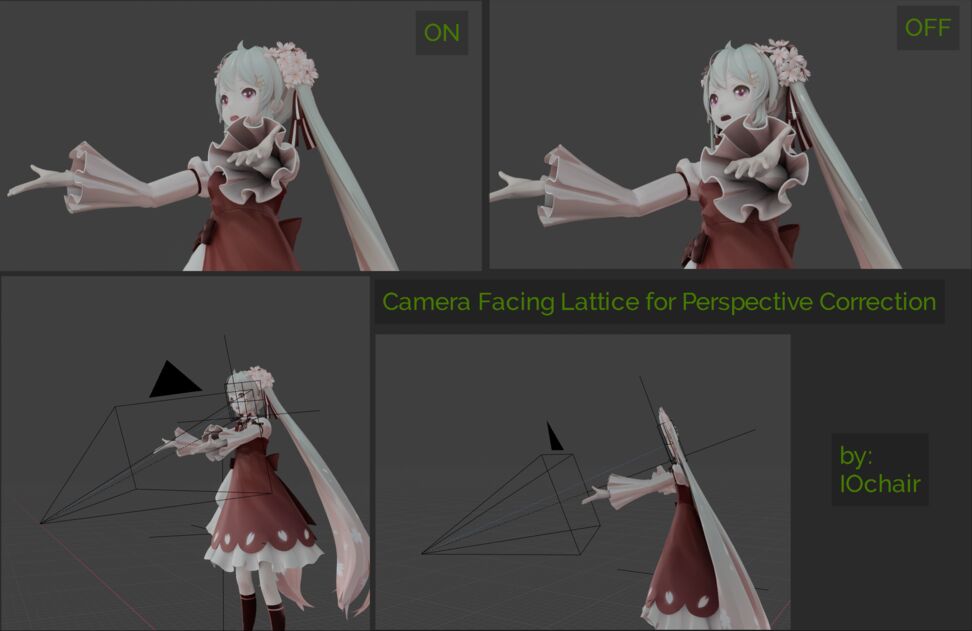
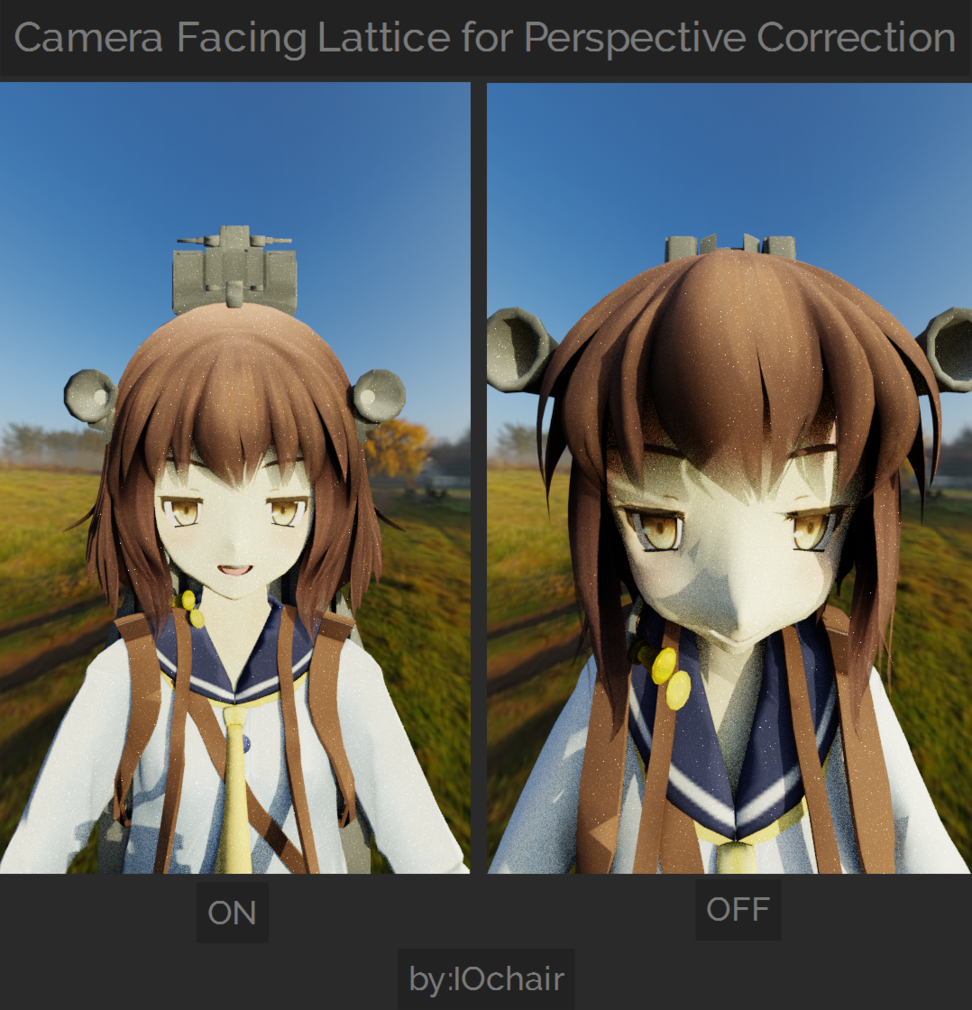
个人认为:以上说法是建立在使用默认光照的情况,一般的卡通渲染都会选择重写光照来控制面部阴影表现。
BasePassVertexShader
代码位于BasePassVertexShader.usf中。可以看得出WorldPosition就是模型的世界坐标,WorldPositionExcludingWPO为没有WorldPositionOffset的版本。WorldPosition加上offset后,乘以MVP矩阵最后输出Output.Position。
以下是我精简过的代码以方便阅读:
/** Entry point for the base pass vertex shader. */
void Main(
    FVertexFactoryInput Input,
    OPTIONAL_VertexID,
    out FBasePassVSOutput Output,
    out float OutGlobalClipPlaneDistance : SV_ClipDistance)
{

    uint EyeIndex = 0;
    ResolvedView = ResolveView();

    FVertexFactoryIntermediates VFIntermediates = GetVertexFactoryIntermediates(Input);
    float4 WorldPositionExcludingWPO = VertexFactoryGetWorldPosition(Input, VFIntermediates);
    float4 WorldPosition = WorldPositionExcludingWPO;
    float4 ClipSpacePosition;

    float3x3 TangentToLocal = VertexFactoryGetTangentToLocal(Input, VFIntermediates);
    FMaterialVertexParameters VertexParameters = GetMaterialVertexParameters(Input, VFIntermediates, WorldPosition.xyz, TangentToLocal);

    // Isolate instructions used for world position offset
    // As these cause the optimizer to generate different position calculating instructions in each pass, resulting in self-z-fighting.
    // This is only necessary for shaders used in passes that have depth testing enabled.
    {
        WorldPosition.xyz += GetMaterialWorldPositionOffset(VertexParameters);
    }

    {
        float4 RasterizedWorldPosition = VertexFactoryGetRasterizedWorldPosition(Input, VFIntermediates, WorldPosition);
        ClipSpacePosition = INVARIANT(mul(RasterizedWorldPosition, ResolvedView.TranslatedWorldToClip));
        Output.Position = INVARIANT(ClipSpacePosition);
    }

#if USE_GLOBAL_CLIP_PLANE
    OutGlobalClipPlaneDistance = dot(ResolvedView.GlobalClippingPlane, float4(WorldPosition.xyz - ResolvedView.PreViewTranslation.xyz, 1));
#endif
    #if USE_WORLD_POSITION_EXCLUDING_SHADER_OFFSETS
        Output.BasePassInterpolants.PixelPositionExcludingWPO = WorldPositionExcludingWPO.xyz;
    #endif
#endif
    Output.FactoryInterpolants = VertexFactoryGetInterpolants(Input, VFIntermediates, VertexParameters);

    OutputVertexID( Output );
}
其他两个函数:
float4 VertexFactoryGetWorldPosition(FVertexFactoryInput Input, FVertexFactoryIntermediates Intermediates)
{
    return TransformLocalToTranslatedWorld(Intermediates.UnpackedPosition);
}

float4 VertexFactoryGetRasterizedWorldPosition(FVertexFactoryInput Input, FVertexFactoryIntermediates Intermediates, float4 InWorldPosition)
{
    return InWorldPosition;
}
矩阵计算
TranslatedViewProjectMatrix
以下是相关的计算代码:
ViewUniformShaderParameters.TranslatedWorldToClip = InViewMatrices.GetTranslatedViewProjectionMatrix();

inline const FMatrix& GetTranslatedViewProjectionMatrix() const
{
    return TranslatedViewProjectionMatrix;
}

TranslatedViewProjectionMatrix = GetTranslatedViewMatrix() * GetProjectionMatrix();

inline const FMatrix& GetTranslatedViewMatrix() const
{
    return TranslatedViewMatrix;
}

inline const FMatrix& GetProjectionMatrix() const
{
    return ProjectionMatrix;
}
Project矩阵
UE4的矩阵与U3D使用的标准OPENGL式的矩阵不同:
- OpenGL中Z坐标被映射到[-1, 1]。而Ue4映射到[0,1],这使得”W”值变为1而不是-1。
- Ue4对其所有的透视矩阵应用了一个矩阵转置。
| UE4 | Value | Unity | Value |
|---|---|---|---|
| [0,0] | 1.0f / FMath::Tan(HalfFOV) | [0,0] | 2.0F * near / (right - left); |
| [1,1] | Width / FMath::Tan(HalfFOV) / Height | [1,1] | 2.0F * near / (top - bottom); |
| [2,0] | 0.0F | [0,2] | (right + left) / (right - left); |
| [2,1] | 0.0F | [1,2] | (top + bottom) / (top - bottom); |
| [2,2] | ((MinZ == MaxZ) ? (1.0f - Z_PRECISION) : MaxZ / (MaxZ - MinZ)) | [2,2] | -(far + near) / (far - near); |
| [3,2] | -MinZ * ((MinZ == MaxZ) ? (1.0f - Z_PRECISION) : MaxZ / (MaxZ - MinZ)) | [2,3] | -(2.0F far near) / (far - near); |
| [2,3] | 1.0f | [3,2] | -1.0f |
自定义投射矩阵效果
继承ULocalPlayer类,重写CalcSceneView函数:
FSceneView * UOffAxisLocalPlayer::CalcSceneView(FSceneViewFamily * ViewFamily, FVector &OutViewLocation, FRotator &OutViewRotation, FViewport * Viewport, FViewElementDrawer * ViewDrawer, EStereoscopicPass StereoPass)
{

    FSceneView* View = ULocalPlayer::CalcSceneView(ViewFamily, OutViewLocation, OutViewRotation, Viewport, ViewDrawer, StereoPass);

    if (View)
    {
        FMatrix CurrentMatrix = View->ViewMatrices.GetProjectionMatrix();

        float FOV = FMath::DegreesToRadians(60.0f);
        FMatrix ProjectionMatrix = FReversedZPerspectiveMatrix(FOV, 16.0f, 9.0f, GNearClippingPlane);
        View->UpdateProjectionMatrix(ProjectionMatrix);
    }
    return View;
}
最后在Project Settings->General Settings->Local Player Class设置定义的新类即可。
详细内容可以参考:http://www.geodesic.games/2019/03/27/projection-matrices-in-unreal-engine/
作者还写了插件:https://github.com/GeodesicGames/SimpleOffAxisProjection
具体计算代码
/** Calculates the projection matrix using this view info's aspect ratio (regardless of bConstrainAspectRatio) */
ENGINE_API FMatrix CalculateProjectionMatrix() const;
FMatrix FMinimalViewInfo::CalculateProjectionMatrix() const
{
    FMatrix ProjectionMatrix;
    ProjectionMatrix = FReversedZPerspectiveMatrix(
        FMath::Max(0.001f, FOV) * (float)PI / 360.0f,
        AspectRatio,
        1.0f,
        GNearClippingPlane );
}
FORCEINLINE FPerspectiveMatrix::FPerspectiveMatrix(float HalfFOV, float Width, float Height, float MinZ, float MaxZ)
    : FMatrix(
        FPlane(1.0f / FMath::Tan(HalfFOV),    0.0f,                                    0.0f,                            0.0f),
        FPlane(0.0f,                        Width / FMath::Tan(HalfFOV) / Height,    0.0f,                            0.0f),
        FPlane(0.0f,                        0.0f,                                    ((MinZ == MaxZ) ? (1.0f - Z_PRECISION) : MaxZ / (MaxZ - MinZ)),            1.0f),
        FPlane(0.0f,                        0.0f,                                    -MinZ * ((MinZ == MaxZ) ? (1.0f - Z_PRECISION) : MaxZ / (MaxZ - MinZ)),    0.0f)
    )
{ }

FORCEINLINE FReversedZPerspectiveMatrix::FReversedZPerspectiveMatrix(float HalfFOV, float Width, float Height, float MinZ, float MaxZ)
    : FMatrix(
        FPlane(1.0f / FMath::Tan(HalfFOV),    0.0f,                                    0.0f,                                                    0.0f),
        FPlane(0.0f,                        Width / FMath::Tan(HalfFOV) / Height,    0.0f,                                                    0.0f),
        FPlane(0.0f,                        0.0f,                                    ((MinZ == MaxZ) ? 0.0f : MinZ / (MinZ - MaxZ)),            1.0f),
        FPlane(0.0f,                        0.0f,                                    ((MinZ == MaxZ) ? MinZ : -MaxZ * MinZ / (MinZ - MaxZ)),    0.0f)
    )
{ }
View矩阵
void FViewMatrices::UpdateViewMatrix(const FVector& ViewLocation, const FRotator& ViewRotation)
{
    ViewOrigin = ViewLocation;

    FMatrix ViewPlanesMatrix = FMatrix(
        FPlane(0, 0, 1, 0),
        FPlane(1, 0, 0, 0),
        FPlane(0, 1, 0, 0),
        FPlane(0, 0, 0, 1));

    const FMatrix ViewRotationMatrix = FInverseRotationMatrix(ViewRotation) * ViewPlanesMatrix;

    ViewMatrix = FTranslationMatrix(-ViewLocation) * ViewRotationMatrix;

    // Duplicate HMD rotation matrix with roll removed
    FRotator HMDViewRotation = ViewRotation;
    HMDViewRotation.Roll = 0.f;
    HMDViewMatrixNoRoll = FInverseRotationMatrix(HMDViewRotation) * ViewPlanesMatrix;

    ViewProjectionMatrix = GetViewMatrix() * GetProjectionMatrix();

    InvViewMatrix = ViewRotationMatrix.GetTransposed() * FTranslationMatrix(ViewLocation);
    InvViewProjectionMatrix = GetInvProjectionMatrix() * GetInvViewMatrix();

    PreViewTranslation = -ViewOrigin;

    TranslatedViewMatrix = ViewRotationMatrix;
    InvTranslatedViewMatrix = TranslatedViewMatrix.GetTransposed();
    OverriddenTranslatedViewMatrix = FTranslationMatrix(-PreViewTranslation) * ViewMatrix;
    OverriddenInvTranslatedViewMatrix = InvViewMatrix * FTranslationMatrix(PreViewTranslation);

    // Compute a transform from view origin centered world-space to clip space.
    TranslatedViewProjectionMatrix = GetTranslatedViewMatrix() * GetProjectionMatrix();
    InvTranslatedViewProjectionMatrix = GetInvProjectionMatrix() * GetInvTranslatedViewMatrix();
}
相关变量定义位置
UE4已经帮我们计算好相关的矩阵,一些矩阵与摄像机相关变量位于一下文件中:
// SceneData.USH
float4x4 LocalToWorld;
float4x4 WorldToLocal;

// SceneView.cpp
// ResolvedView
ViewUniformShaderParameters.ViewToTranslatedWorld = InViewMatrices.GetOverriddenInvTranslatedViewMatrix();
ViewUniformShaderParameters.TranslatedWorldToClip = InViewMatrices.GetTranslatedViewProjectionMatrix();
ViewUniformShaderParameters.WorldToClip = InViewMatrices.GetViewProjectionMatrix();
ViewUniformShaderParameters.ClipToWorld = InViewMatrices.GetInvViewProjectionMatrix();
ViewUniformShaderParameters.TranslatedWorldToView = InViewMatrices.GetOverriddenTranslatedViewMatrix();
ViewUniformShaderParameters.TranslatedWorldToCameraView = InViewMatrices.GetTranslatedViewMatrix();
ViewUniformShaderParameters.CameraViewToTranslatedWorld = InViewMatrices.GetInvTranslatedViewMatrix();
ViewUniformShaderParameters.ViewToClip = InViewMatrices.GetProjectionMatrix();
ViewUniformShaderParameters.ViewToClipNoAA = InViewMatrices.GetProjectionNoAAMatrix();
ViewUniformShaderParameters.ClipToView = InViewMatrices.GetInvProjectionMatrix();
ViewUniformShaderParameters.ClipToTranslatedWorld = InViewMatrices.GetInvTranslatedViewProjectionMatrix();
ViewUniformShaderParameters.ViewForward = InViewMatrices.GetOverriddenTranslatedViewMatrix().GetColumn(2);
ViewUniformShaderParameters.ViewUp = InViewMatrices.GetOverriddenTranslatedViewMatrix().GetColumn(1);
ViewUniformShaderParameters.ViewRight = InViewMatrices.GetOverriddenTranslatedViewMatrix().GetColumn(0);
ViewUniformShaderParameters.InvDeviceZToWorldZTransform = InvDeviceZToWorldZTransform;
ViewUniformShaderParameters.WorldViewOrigin = InViewMatrices.GetOverriddenInvTranslatedViewMatrix().TransformPosition(FVector(0)) - InViewMatrices.GetPreViewTranslation();
ViewUniformShaderParameters.WorldCameraOrigin = InViewMatrices.GetViewOrigin();
ViewUniformShaderParameters.TranslatedWorldCameraOrigin = InViewMatrices.GetViewOrigin() + InViewMatrices.GetPreViewTranslation();
具体实现与效果
将这个Custom节点直接连到WorldPositionOffset即可。
//float3 WorldPosition
//float ZClampValue
//float3 ObjectPosition

// const float4x4 localToWorld=Primitive.LocalToWorld;
const float4x4 WorldToView=ResolvedView.TranslatedWorldToView;
const float4x4 ViewToWorld=ResolvedView.ViewToTranslatedWorld;

float3 ViewSpacePosition=INVARIANT(mul(WorldPosition, WorldToView));
float pivortZ=INVARIANT(mul(ObjectPosition, WorldToView)).z;
ViewSpacePosition.z=(ViewSpacePosition.z-pivortZ)/ZClampValue+pivortZ;
return INVARIANT(mul(ViewSpacePosition,ViewToWorld))-WorldPosition;
这里我使用原神中莫娜作为演示模型,使用的是Unlit自发光材质:

原始模型

缩放0.5

缩放0.3

缩放0.2
思考与改进
这个压扁操作本质上为了降低模型的透视效果,使得角色的脸部更加的平面化。但目前这个做法比较粗暴,还有很大的改进空间:
- 我们只需要调整角色脸面向相机且较为靠近相机的顶点。
- 透视效果与fov、相机坐标下模型的Z具有线性关系,可以根据这些关系来调整“压扁值”。
- 调整的方向是鼻子、嘴、眼睛等具有重点轮廓区域。不对脸部进行较大数值的调整,使得阴影不会产生较大的形变。
重新计算法线
IOchair通过Blender晶格变形实现该效果的。而DCC工具中的晶格变形会重建顶点法线。所以我也需要在UE4中实现这个功能。经过404查询,得知在GPU精粹有中解决方法:
- 微分附近顶点求得法线。
- 使用雅可比矩阵。
第一种方法比较简单,只需要通过ddx与ddy计算WorldPosition,即可得到切线法线值。
第二种方法我会在学习之后补上。
回顾第一种方法时还找到有意思的资料:
- 通过ddx、ddy与Cross去除平滑法线效果:
![image]()
![image]()
https://answers.unrealengine.com/questions/29087/disable-terrain-smoothing.html#answer-30100
- 通过Noise生成世界法线的方法:
![]()
https://odederell3d.blog/tag/ddy/
PS.晶格变形用的是FreeFormDeformation算法,直接搜索Lattice Deformation是找不到资料的。


